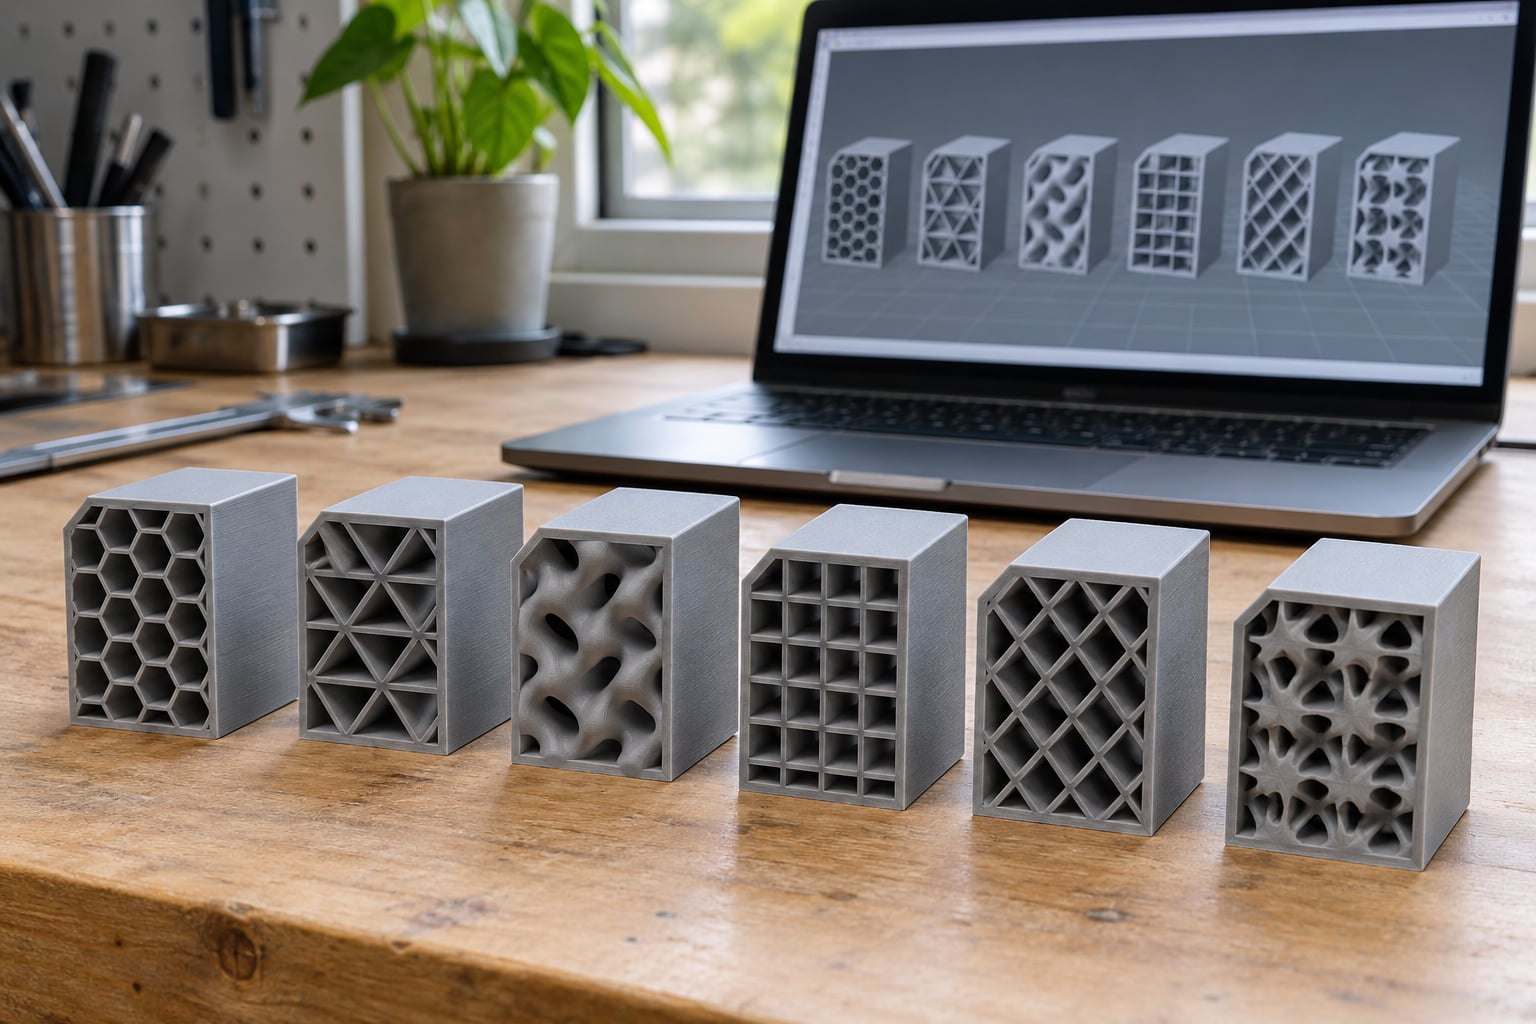
If you want one short answer: gyroid gives the best balance of strength and print time for most functional FDM parts, and lightning is the fastest to print but should stay out of load-bearing work. Neither wins every job. A pattern’s real performance depends on density, wall count, layer height, material and how the part is oriented on the bed, so this guide compares infill patterns on the two axes people actually care about: how much load they carry and how long the printer runs.
Most infill arguments online go nowhere because each side is comparing a different set of conditions. A 60% grid cube and a 15% gyroid cube are not comparable specimens, which is why infill patterns compared for strength and print time get oversold so often. Once you hold material, density, layer height, wall count and part size constant, the picture gets much clearer, and most of the folklore about “the strongest pattern” dissolves.
Table of Contents
- Infill Patterns Compared for Strength and Print Time at a Glance
- Which Infill Pattern Is Strongest?
- How Infill Patterns Affect Strength and Print Time
- Which Infill Pattern Prints Fastest?
- How Do Infill Patterns Affect Surface Quality and Printability?
- Infill Density, Layer Height, and Wall Count
- Which Infill Pattern Should You Choose?
- Frequently Asked Questions
- What infill percentage should I use for a functional FDM part?
- Does 100% infill make a 3D print stronger?
- Which infill pattern is best for PLA and PETG?
- Does print direction change the strength of an infill pattern?
- Is gyroid infill stronger than rectilinear infill?
- Conclusion
Infill Patterns Compared for Strength and Print Time at a Glance
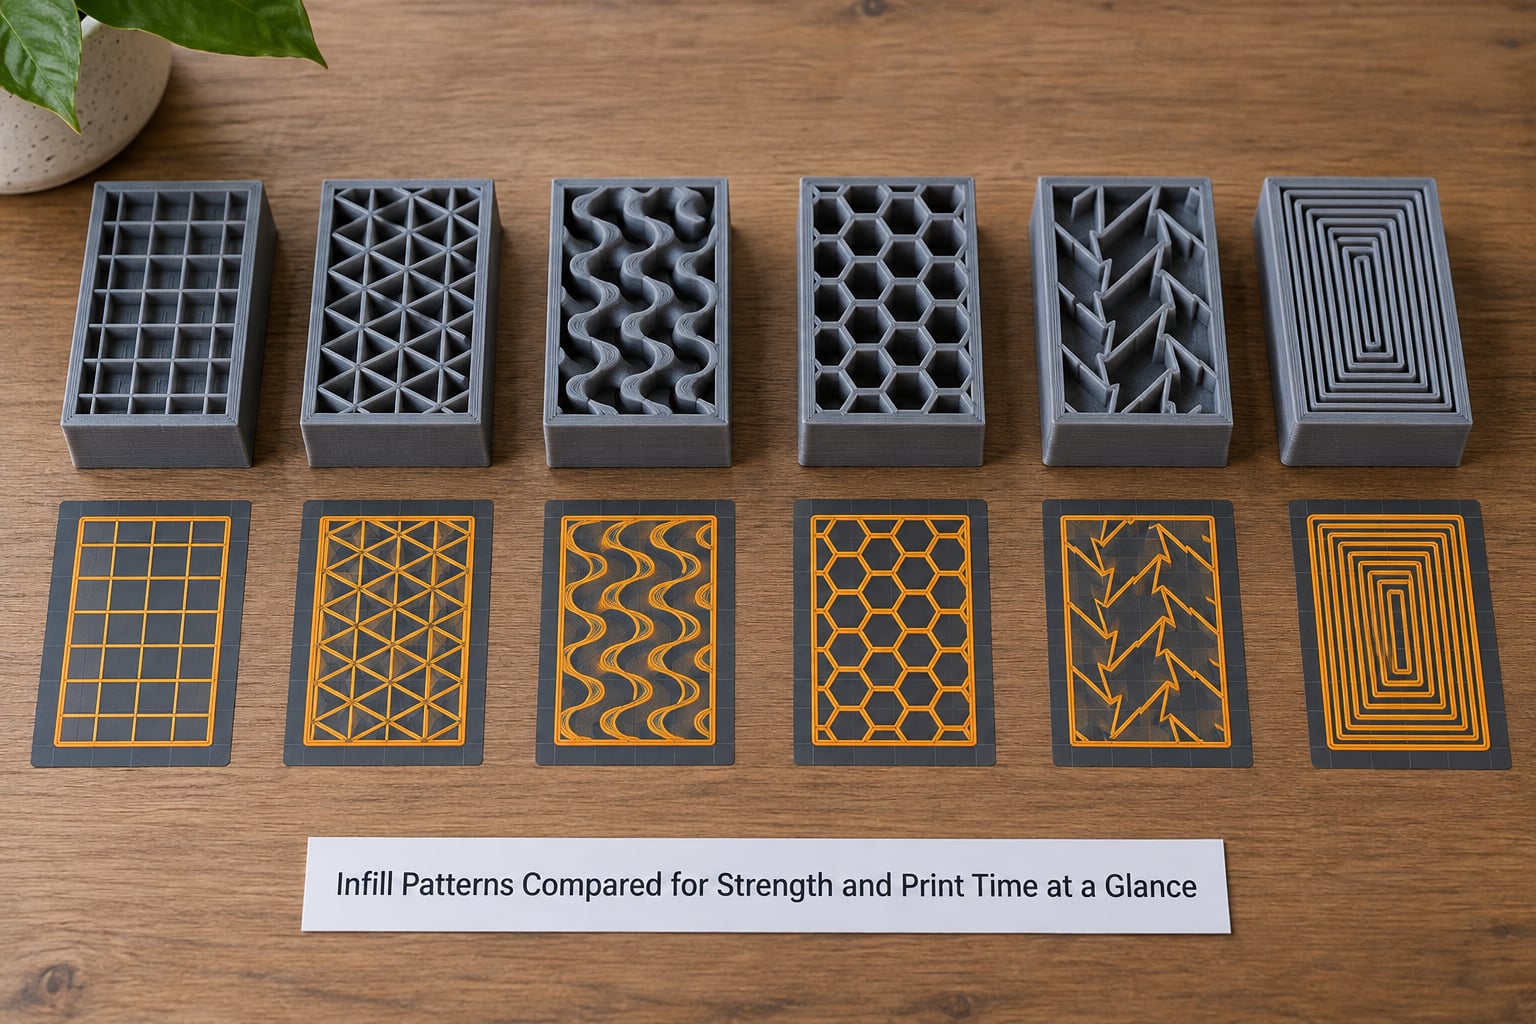
The table below ranks six common infill patterns across the properties that decide whether a part works. Ratings describe general tendencies for a typical functional part at moderate density, not guaranteed results. A pattern that looks weak on paper can still produce a strong part when walls do most of the work, and a pattern rated strong can disappoint in a thin, poorly oriented part.
| Pattern | In-plane strength | Cross-layer strength | Print time | Material use | Surface quality | Overhang behavior | Best for |
|---|---|---|---|---|---|---|---|
| Rectilinear (lines) | Good along the line direction, weaker across | Low | Fast at low density | Low to moderate | Good | Acceptable | Fast drafts, vases, low-stress parts |
| Cubic | Good, anisotropic | Moderate | Moderate | Moderate | Good | Good | General functional parts, supports |
| Gyroid | Good, near-isotropic | Good | Moderate to slow | Moderate to high | Very good | Very good | All-direction strength, heat and pressure parts |
| Honeycomb (2D) | Good in the layer plane | Low | Slow | High | Very good | Good | Flat parts, stiff thin panels, resin fill |
| Lightning | Low | Low | Fastest | Very low | Top surfaces only, rough elsewhere | Poor for flat bridges | Drafts, ornaments, large low-stress shells |
| Concentric | Good radially | Moderate | Moderate | Moderate | Very good on round walls | Good on cylinders | Vases, round parts, visible surfaces |
Two things stand out. Honeycomb and gyroid are the two material-hungry patterns, and lightning is the one that gives back nearly all of its material. Cross-layer strength is weak across the board for 2D patterns, which is why pattern choice interacts so heavily with print orientation.
Which Infill Pattern Is Strongest?
No pattern is strongest on its own, because strength in an FDM part comes from six variables working together: pattern geometry, infill density, wall count, layer height, material and the direction the part sits on the bed. Change any one of them and the ranking can move. The honest answer is that gyroid and cubic generally carry more load than rectilinear at the same density, but a part with four perimeters at 15% infill will usually beat one with two perimeters at 80%, and print orientation can undo the whole table.
It helps to separate two different kinds of load. In-plane strength is force applied parallel to the layers, and 2D patterns such as rectilinear, grid and honeycomb are built for it. Cross-layer strength is force trying to peel the part apart between layers, and it depends far more on layer adhesion, perimeters and material than on the pattern name.
Isotropic means the material resists load roughly equally in every direction. Anisotropic means it depends on orientation, and most infill is anisotropic because extruded beads are strongest along their own length and weaker where neighbouring beads meet at an angle. Gyroid approaches isotropic behaviour because its curved surfaces run in many directions continuously, which is why it is popular for parts that twist or flex in unpredictable orientations.
How Infill Patterns Affect Strength and Print Time
To compare patterns honestly, hold everything except the pattern constant: same material batch, same density, same layer height, same wall count and line width, same nozzle temperature, same part size, same slicer and settings. Then print five coupons and test them three ways: compression, tension along the layer plane, and a layer-separation or twist test.
Expected results at fixed density run roughly like this. Gyroid holds the most load across directions but takes longer and uses more filament. Honeycomb is stiff inside the layer plane but weak between layers, so a coupon twisted about its long axis fails early. Lightning, at 20% density, carries little load and a coupon snapped in hand before reaching the test rig. Rectilinear at low density is fast and reasonably stiff in one direction, weak the other way. Concentric behaves like rectilinear but follows the outline, so it suits curved parts.
If the part carries a real load, print those coupons rather than trusting a forum answer. It costs a few hours and it settles the question for your printer, your filament and your layer height, which no table can.
One thing forum threads get right: gyroid never crosses its own path, so it does not produce the small blobs at intersections that show up in cubic or grid. r/3Dprinting regulars point that out often, and it explains part of why gyroid is easier on the nozzle.
Which Infill Pattern Prints Fastest?
Lightning is usually the fastest infill pattern available, because it prints only near the walls and leaves the core empty, which removes most of the extrusion path. Rectilinear at low density is the practical runner-up, since it lays long uninterrupted straight lines with few direction changes. Beyond that, print time follows a predictable order: cubic and concentric sit in the middle, and gyroid and honeycomb are the slowest because they curve constantly and lay down more material.
Print time is driven by four things, and only one of them is material:
- Extrusion path length. More metres of filament at the same flow rate means more minutes. Honeycomb at the same density as rectilinear can use noticeably more filament, and Prusa’s knowledge base puts honeycomb at roughly a quarter more material than rectilinear in its own comparison, with print time approaching double.
- Direction changes. Every corner is a slowdown. The printer has to decelerate, change direction and accelerate again. Curved patterns like gyroid and lightning force constant small changes, so even when total path length is similar, real time can differ noticeably.
- Travel moves. Moving across empty space costs time with no filament laid down. Sparse patterns and anything that leaves the core empty produce fewer long travels.
- Top surface support. Infill that touches the top layer has to be packed tightly enough to hold it up during printing. That dense skin over sparse infill is pure added time, and it is the hidden cost of patterns with poor top-surface support.
One wrinkle worth knowing: slice time is not print time. Complex curved patterns can take noticeably longer to slice in the slicer preview, which is frustrating on a big model but has no effect on how long the nozzle moves.
How Do Infill Patterns Affect Surface Quality and Printability?
Patterns change far more than strength. They change how the top of the part looks, whether it needs supports, and how forgiving the print is.
Top surfaces. Lightning infill provides little internal support for the top layers, so a lightning part often has a slightly uneven top or needs a solid top layer setting. Rectilinear and cubic sit at the other extreme: evenly spaced lines support the top well. Gyroid touches the top layer at a high contact rate and gives one of the cleanest top surfaces of the curved patterns.
Overhangs and bridging. Honeycomb holds up well under an overhang because each cell is a closed hexagon and the geometry is inherently stable. Gyroid is close behind. Rectilinear at low density has gaps the nozzle can sag through, which is why bridging settings matter. Concentric is excellent on curved walls and poor on flat horizontal bridges, because the lines run across a gap with nothing to hold them.
Nozzle drag and noise. Grid infill is the one pattern regulars complain about most. Where two lines cross, the nozzle rubs over material it just laid down, which makes a scraping sound and can cause a failed layer or a blob on the surface. Aligned rectilinear is the same geometry with every line parallel, so nothing crosses anything.
Flexible materials. TPU and TPE behave differently from rigid filaments. Open patterns with long continuous paths, such as rectilinear lines, concentric and cross or cross-3D, tend to print more cleanly, while dense curved patterns can snag and bunch. Lower the speed and check flow before changing pattern, because most TPU problems are speed or retraction first.
Castable and fillable parts. If you plan to pour resin into a printed shell or cast into it, the pattern needs to drain and let the fill flow. Honeycomb, gyroid, Hilbert curve and Archimedean chords all drain cleanly. Lightning is the opposite choice, since it leaves large sealed voids.
Infill Density, Layer Height, and Wall Count
Density is where most print-time savings live, and it is also where strength claims get muddied. Going from 100% solid down to 40% or 20% saves a large share of print time because it removes real extrusion. After that, the returns flatten: doubling from 20% to 40% adds material but the part’s strength was already being limited by its perimeters and layer adhesion.
Walls matter more than most people expect. Perimeters are continuous extruded loops, so they carry tension and bending loads far better than the sparse internal lattice at the same printed mass. Adding a third or fourth wall typically does more for a functional part than tripling infill density, and it costs less time than the density change.
Layer height is the third lever. Thinner layers mean more extrusion paths, better layer bonding and smoother surfaces, but longer prints. Thicker layers bond more weakly between layers but print faster. If your part fails by splitting between layers, thinner layers and higher temperature help more than any infill pattern change.
A workable density guide:
- Low, 10 to 20 percent: quick prototypes, display models, large shells, anything held rather than loaded. Pair with four or more walls.
- Medium, 20 to 40 percent: most functional parts, hooks, clips, brackets and enclosures. This is where gyroid, cubic or honeycomb all work well.
- High, 40 percent and above: parts under real load or heat, plus short layers of material that will be cut or tapped. Past roughly 60 percent, gain per hour gets poor and solid walls plus moderate infill is often the better trade.
Top and bottom layers are a separate lever in PrusaSlicer and some other slicers, where you can choose the fill pattern for the solid top and bottom layers independently of the body infill. It changes surface appearance and top-surface support without touching body strength.
Which Infill Pattern Should You Choose?
Functional brackets, mounts and load-bearing parts: gyroid at 20 to 40 percent with four or five perimeters. It handles twisting loads that would split a rectilinear part, which matters for anything bolted to a wall. For ASA or PC parts near heat, raise density and keep the layer count high.
Hooks, clips and latches that flex repeatedly: cubic or gyroid at moderate density. Both hold up when the load cycles rather than sitting still, and neither has the sharp corners that can snap.
Vases and visible parts: concentric at low density with two or three perimeters. The pattern follows the outline, so the surface stays smooth and the interior stays hollow and light.
Quick prototypes and fit checks: rectilinear or lightning at 10 to 15 percent. You are checking geometry, not surviving loads, and print time matters most here.
Supports inside another print: support cubic or adaptive cubic. They print reliably, they hold the weight above them without being dense, and they release easily.
Decorative models and cosplay props: cubic or honeycomb at 15 to 25 percent with heavier top and bottom layers, since surface quality matters and nobody is loading the piece.
Outdoor and weather-exposed parts: PETG or ASA with gyroid at 30 to 50 percent. UV and moisture cycling punish thin cross-sections, and the pattern’s all-direction strength helps at the exposed edges.
Heat-exposed or pressure parts: gyroid, because its trapped cells slow heat transfer and its geometry does not have a weak direction.
Castable or resin-filled shells: honeycomb, gyroid or Hilbert curve at 15 to 30 percent, since they drain and fill evenly. Keep lightning away from anything you plan to fill.
Two cases where infill is the wrong answer. If a part is being machined or tapped, print it near solid with generous perimeters. And if a joint has to survive shock loading or a person leaning on it, more infill will not save it. Use more walls, a better material, or change the process entirely.
Frequently Asked Questions
What infill percentage should I use for a functional FDM part?
Most functional parts do fine at 20 to 30 percent infill with four or more perimeters, because the walls carry most of the load. Raise it toward 40 to 50 percent for load-bearing brackets, threaded inserts or parts under heat. Below 15 percent, add walls rather than more density, since low-density infill adds time and material without adding much stiffness once the perimeters are right.
Does 100% infill make a 3D print stronger?
It makes the part solid, but not proportionally stronger. Cross-layer strength in an FDM part is limited by layer adhesion rather than by solid material, so 100 percent infill still splits between layers if bonding is poor. You pay a large amount of print time and filament for stiffness you could get more cheaply with five perimeters at 40 percent infill.
Which infill pattern is best for PLA and PETG?
For both, gyroid at 20 to 30 percent is a safe general choice, and cubic is faster if the part does not twist under load. PETG prints more slowly than PLA and holds heat better, so it also suits higher densities for warm parts. Grid infill is worth avoiding on both materials because crossing lines drag the nozzle and add noise.
Does print direction change the strength of an infill pattern?
It changes it a great deal, and often more than the pattern itself. Extruded beads are strongest along their length and weakest where they meet, so rotating a part on the bed reorients both the load and the infill relative to the load. For parts that twist or flex in several directions, choose an isotropic pattern such as gyroid, then test a coupon in the actual orientation.
Is gyroid infill stronger than rectilinear infill?
At the same density, gyroid is generally stronger because it carries load in many directions and never crosses its own path, while rectilinear is strong along the line direction and weak across it. The gap narrows fast once you add walls, since four perimeters on a rectilinear part will outperform one perimeter on a gyroid part of the same density.
Conclusion
Pick the pattern for the job rather than for the reputation: gyroid for all-direction strength on functional parts, cubic when speed matters more than twist resistance, honeycomb for stiff thin panels and resin fill, concentric for round visible parts, rectilinear for fast drafts, and lightning only where nothing needs to hold load. Infill patterns compared for strength and print time only settle honestly once density, walls and orientation are held constant. Set density and perimeters so the walls carry the work, print a small coupon in the same orientation as the real part, and check it before committing to a full build.