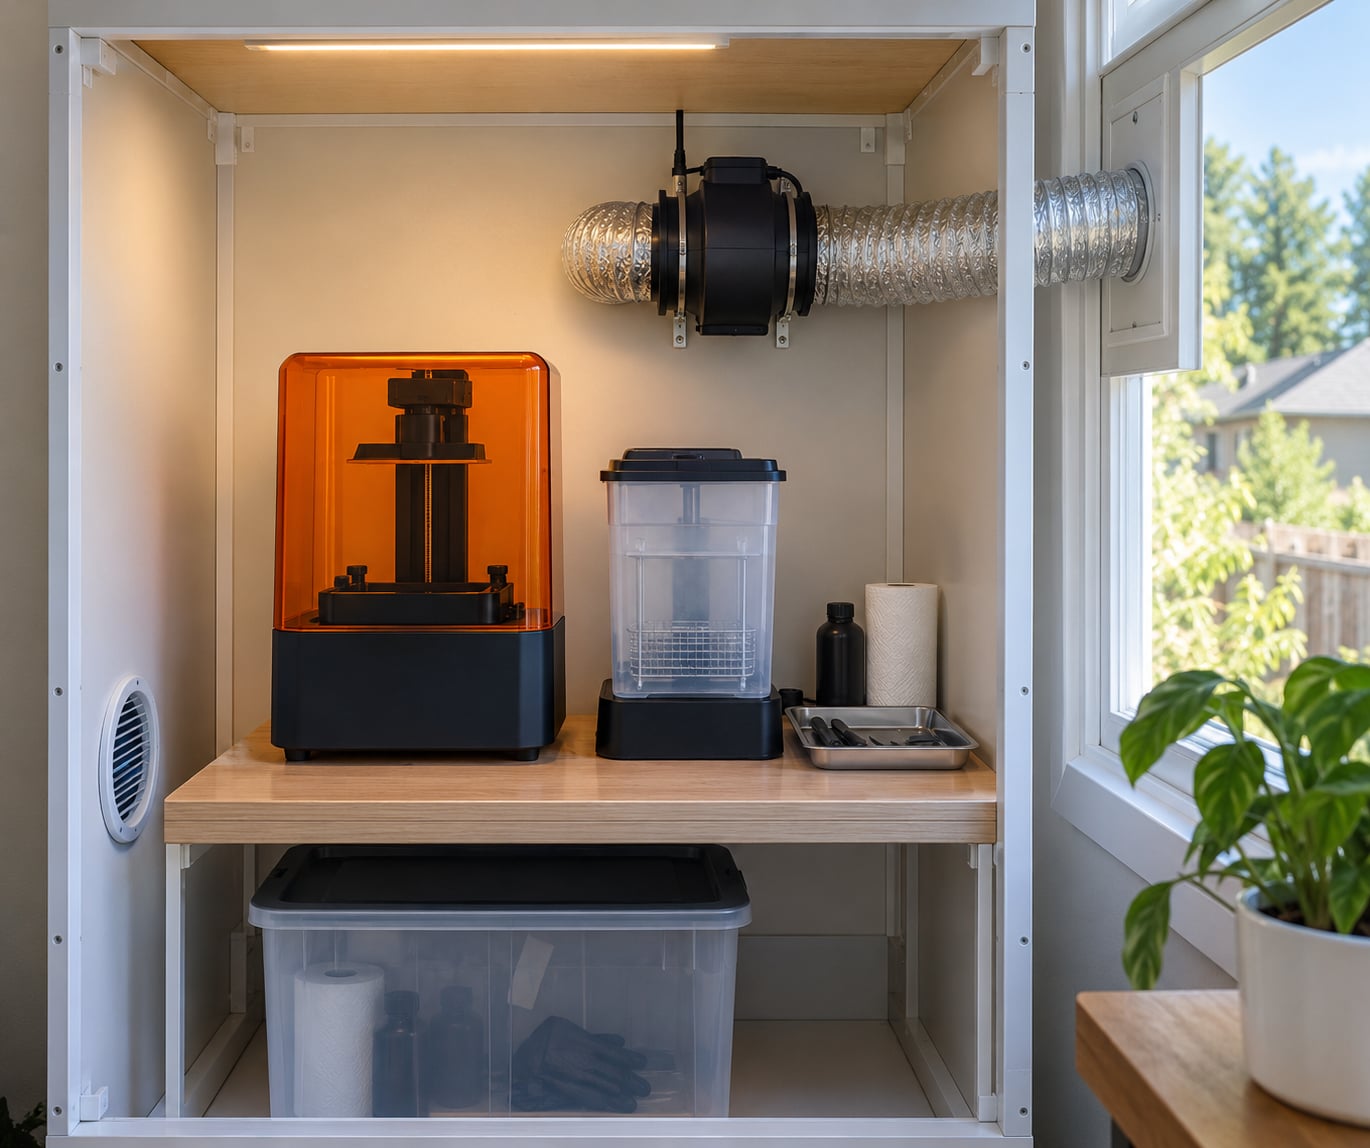
A resin printer vented enclosure setup is an enclosed workspace, such as a grow tent, a cabinet, or a custom rigid box, fitted with an exhaust fan and ducting that pulls fumes at their source and carries them out of the space. The enclosure runs at slightly negative pressure so any leak pulls room air inward instead of pushing fumes outward.
Yes, a resin printer should be ventilated, ideally exhausted outdoors. Uncured photopolymer resin and the isopropyl alcohol used to wash prints both release volatile organic compounds, and running a print on an open desk in a closed room means you breathe them.
One thing to plan around: continuous airflow can drop the temperature inside the enclosure, and resin printers need a stable, warm ambient temperature for reliable cure depth. The fix is a controlled extraction rate and a room-heated enclosure, not switching the fan off.
This guide walks through the full build in the order that works, from reading the resin safety data sheet to testing the finished installation. Allow an afternoon for assembly and a week of monitoring before you trust it.
Table of Contents
- What You Need for a Resin Printer Vented Enclosure Setup
- Documents to read first
- Enclosure and structure
- Air handling and duct
- What to keep out of the airflow path
- Step-by-Step: Building the Setup in One Afternoon
- 1. Check the Resin and Printer Instructions
- 2. Design the Resin Printer Vented Enclosure Setup
- 3. Install the Enclosure Without Sealing the Printer
- 4. Fit the Filter, Fan, and Ducting
- 5. Add Spill and Waste Management
- 6. Route the Exhaust Outdoors
- 7. Test and Monitor the Setup
- Common Mistakes and How to Correct Them
- Frequently Asked Questions
- Do resin printers need to be enclosed?
- Can a carbon filter make a resin printer safe indoors?
- Should the ventilation fan run continuously while printing?
- Where should a resin printer enclosure exhaust?
- Can I use a grow tent for a resin printer?
- What should I do if I still smell resin after installing ventilation?
- Conclusion: Start With the SDS, Then the Enclosure
What You Need for a Resin Printer Vented Enclosure Setup
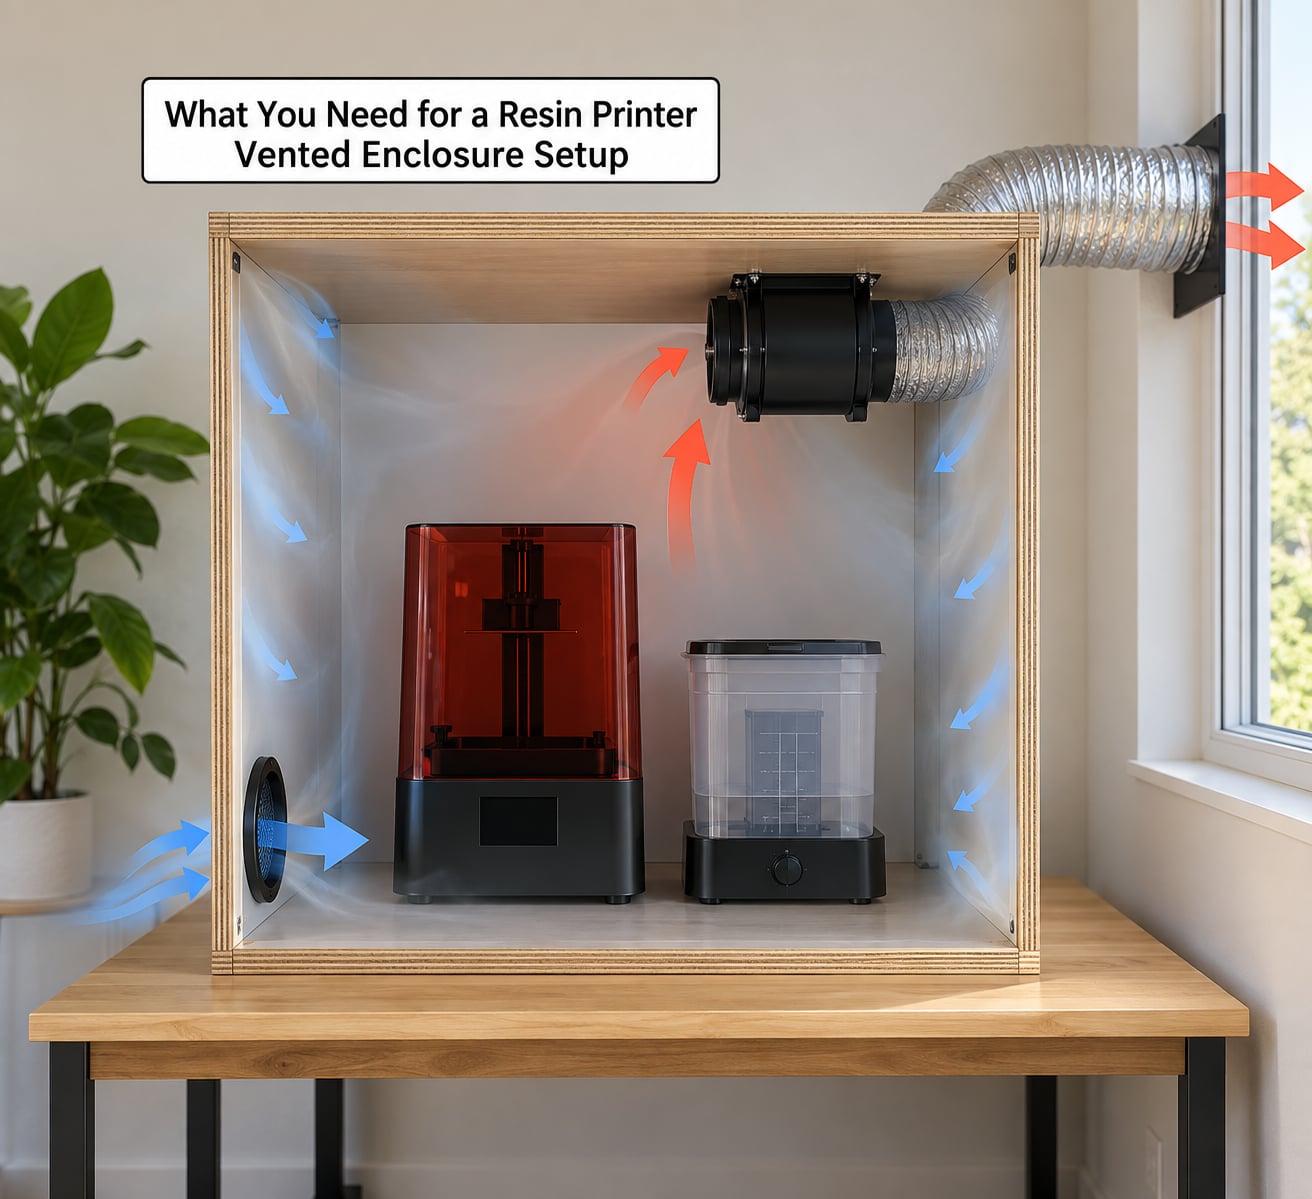
Ventilation hardware is not a place to guess. Select it from the resin manufacturer’s safety data sheet and the printer’s own instructions, because the acceptable exposure controls, temperature range, and handling precautions are set there, not by how strong the smell happens to be on day one.
Documents to read first
The safety data sheet for the exact resin you use, and the printer manual. These give you the volatile exposure guidance, the recommended working temperature, the required ventilation approach, and the manufacturer’s own exclusions.
Enclosure and structure
- Rigid, cleanable panels sized so the printer, its lift, and the vat can be accessed with the door in place
- An access door that closes reasonably well, with a gasket or brush seal along the closing edge
- A low-level make-up air intake, either a filtered port or a deliberate gap, so air can enter and the fan does not stall
- A drip or catch tray that lifts out for cleaning
Air handling and duct
- An inline or axial duct fan appropriate for the duct diameter you are running
- An inline carbon-filter housing with replaceable activated carbon media, rated for the fumes it will actually see
- Rigid ducting, or flexible duct sealed and supported, plus clamps, fittings, and sealing material rated for the joint
- An outdoor discharge hood or cap that keeps rain out while allowing air out
- A removable insect screen or lint guard at any outdoor termination
Also useful: a carbon-rated respirator cartridge or full-face respirator for the moments when you open the enclosure, nitrile gloves, safety goggles, and basic hand tools. The gloves and goggles are not optional, and the enclosure does not replace them.
What to keep out of the airflow path
Glass-front doors, cutlery, solvents, and anything combustible do not belong near the extraction path. Keep waste containers and washing supplies in a separate area from the fan and duct, and keep the printer’s own power supply where no liquid can reach it.
Step-by-Step: Building the Setup in One Afternoon
1. Check the Resin and Printer Instructions
Read the safety data sheet for the exact resin in the vat and the printer manual before you cut or drill anything. You are looking for four things: the recommended ventilation approach, the temperature range the printer needs for consistent results, the handling precautions for uncured resin, and any statement about what the manufacturer requires around the printer’s own vents.
Success looks like: you can state in one sentence what the resin documentation asks you to do about vapors, and you know your printer’s minimum working temperature.
Safety boundary: a generic recommendation to add a fan is not a substitute for the manufacturer’s guidance. If the resin documentation and the printer documentation disagree, follow the more restrictive one and contact the manufacturer before proceeding.
2. Design the Resin Printer Vented Enclosure Setup
Plan the extraction point before you buy anything. Mount the fan and port high in the enclosure, on the rear or side wall, near where the printer normally releases its resin vapors during printing and post-processing. Leave clearance for the Z lift, the control panel, the vat, and the door, and keep the printer’s own ventilation openings unobstructed.
Route the discharge to an outdoor termination you have already decided on. One-way extraction to the outside reliably beats sealing a room and recirculating the air, and it also beats a room purifier alone, because the purifier treats air that has already mixed through the room.
Here is the airflow in plain text:
   outdoors <--- [ discharge hood ] --- duct --- [ FILTER ] --- [ FAN ]  (high, rear wall)
   [[                                                    PRINTING ]]
   [[                              WASH + CURE STATION    ]]
   [[  *  low make-up air intake: room air drawn IN  *  ]]   (low, opposite wall)
   room air leaks inward through any gap in the panels and door seal
Success looks like: the enclosure holds a small, steady negative pressure, and the intake path is not blocked by a bin, a chair, or a stacked box of filament.
Safety boundary: do not place the intake in a position that short-circuits the extraction, such as directly opposite the discharge port at the same height. Air will take the shortest path and skip the printer.
3. Install the Enclosure Without Sealing the Printer
Assemble the rigid panels around the printer and leave the manufacturer’s required ventilation openings clear. Fit the door so it closes well enough to hold pressure, then check that it does not pinch the printer’s moving parts when it swings.
Keep the enclosure from touching heated printer components, and keep every cable routed so it is not pinched against a panel edge or resting where a spill can reach it. Cleanable surfaces matter here: you will be wiping uncured resin out of this space regularly.
Success looks like: the panels are rigid, the door closes, and the printer’s vents still see open air.
Safety boundary: thin plastic sheeting, exposed wiring, and combustible materials near a fan motor are all avoidable failures. If the enclosure leans on anything soft, reinforce it instead.
4. Fit the Filter, Fan, and Ducting
Install the carbon-filter housing and the fan in series in the extraction path, and follow each component’s own instructions for which way the air should travel through it. A filter fitted the wrong way bypasses most of the media, and a fan fitted the wrong way wastes its rating.
Keep the duct run short and straight. Every bend and every length of flex costs airflow, and a loose connection pulls room air into the duct instead of enclosure air. Seal each joint with material rated for the joint, and clamp it.
Isolate the fan motor from the enclosure interior so its noise and heat stay outside the working volume. The fan, the filter, and the resin combination has to be suitable for the actual fumes, and nothing in the path should introduce an ignition source.
Success looks like: you can hold a strip of tissue at the door seam and feel steady suction pulling toward the fan.
Safety boundary: a filter does not remove every vapor, and a fan does not make an unsafe resin safe. If your setup depends on a recirculating filter alone, treat that as a mitigation rather than a solution.
5. Add Spill and Waste Management
Keep uncured resin in a compatible covered or lidded container, and use a removable drip or catch tray beneath the printer and the wash station. The tray should lift out without disturbing anything electrical and should be washed before residue cures into a film.
Keep disposal vessels separate from the ventilation components. Nothing containing liquid resin or cleaning waste should be able to reach the fan, the filter, or the duct, and no drain or ordinary trash route is a disposal path for uncured resin. Follow your local rules for resin and solvent waste, which usually means a dedicated sealed container and a proper collection point.
Success looks like: you can pull the tray, empty it, and wipe it without moving the printer or unplugging anything.
Safety boundary: a tray is not a lid. Uncured resin that sits open is an emission source in its own right, so cap it when you are not working with it.
6. Route the Exhaust Outdoors
Choose a discharge point away from doors, windows, air intakes, your neighbors’ windows, and any ignition source. If the duct passes through a wall, use a proper sleeve and sealant rated for the penetration, and check whether any local building or fire code applies to the opening.
Slope the duct slightly so condensation runs back toward the enclosure rather than pooling at the outdoor end, and fit the discharge hood so rain cannot enter. Watch for condensation inside the duct during humid weather; it is a normal part of outdoor extraction and it needs a drain route.
Success looks like: on a cool morning the duct is cool and slightly damp near the outdoor end, with no pooling at the hood.
Safety boundary: do not discharge into a garage, attic, crawl space, or occupied room. A soffit or an exterior wall high above ground level is usually the practical choice. If you rent and cannot reach an exterior wall, this is the point to have a conversation with your landlord rather than improvise.
7. Test and Monitor the Setup
Check airflow before you ever pour resin. Run the fan with the enclosure closed, confirm steady suction, then open the door briefly and confirm the enclosure refills with room air rather than pushing outward. A tissue test at the seams and an incense stick held near the intake are both quick ways to see the direction of flow.
Then run a short test print and watch for backpressure, duct noise that changes pitch, or condensation forming on the printer’s own shield. Log what you smell and when, for a couple of weeks.
Success looks like: the room smells like the printer area only when you open the door, and nothing in the room smells faintly resin at all.
Safety boundary: ventilation is one layer. You still need nitrile gloves, eye protection, and to follow the resin documentation’s handling and ventilation requirements. If odor persists, if fumes leak at a seam, or if anyone develops headache, eye irritation, throat irritation, or nausea, stop and reassess the installation rather than adjusting it by guesswork.
Common Mistakes and How to Correct Them
Sealing the enclosure with no extraction. A closed box traps fumes and can raise concentration inside. Add controlled extraction with a low make-up air intake.
Recirculating inside the room only. Filtering air back into the same small room is a mitigation, not removal. Exhaust outdoors whenever the site allows it.
Cardboard, foil, or improvised ducting. These leak, do not seal, and are combustible near a fan. Use rigid ducting with rated fittings and clamps.
Fan overheating. Over-restricting the intake, starving the airflow, or running continuously at maximum speed in a hot room can cook the motor. Add proper intake area and follow the fan’s duty guidance.
Blocked printer vents. Panels pressed against a control screen or intake grille reduce the printer’s own cooling. Keep manufacturer-required openings clear and re-read the manual’s clearance notes.
Poor duct seals. A gap at a joint is an uncontrolled make-up air leak that steals suction. Reseal and re-clamp every joint, then retest with a tissue.
Placing the fan after a filter that was not selected for the job. A filter chosen for dust will saturate with vapor and stop capturing it. Use carbon media specified for vapor adsorption and check the fan’s orientation against the housing instructions.
Liquid resin reaching the airflow path. A cracked container or a missing drip tray can send liquid into a fan or filter, and there is no safe way to clear that. Fix containment before you clear anything else.
Unsafe outdoor discharge. A discharge near an air intake or a neighbor’s window moves the problem rather than solving it. Pick a termination point that satisfies the local rules and the neighborly ones.
Treating no odor as proof of safety. Odor fatigue is real, and sensitivity varies. Rely on airflow design, documentation, and monitoring rather than on your nose.
A short maintenance rhythm keeps this honest. Inspect the duct and seals monthly, wash the drip tray before it cures, and check the carbon media by odor: replace it when the resin smell starts returning, and check the pre-filter for loading at the same time. Track it rather than guessing, and record the replacement date.
Frequently Asked Questions
Do resin printers need to be enclosed?
Yes, and the enclosure is only half of the job. An enclosure keeps fumes near the source so a fan can capture them, but without extraction the vapors simply accumulate inside a box. A complete resin printer vented enclosure setup combines rigid panels, a door that holds pressure, a low air intake, and a filtered or outdoor exhaust. Start from the resin safety data sheet and your printer manual.
Can a carbon filter make a resin printer safe indoors?
A carbon filter is a mitigation, not a guarantee. Activated carbon adsorbs many vapors, and it is the same media used in vapor respirator cartridges, but it saturates quickly and it does not remove every compound. Combine it with carbon rated for vapor use, a HEPA stage for particles, and real airflow. Exhausting outdoors is the stronger control.
Should the ventilation fan run continuously while printing?
Usually yes, whenever resin is in the printer or the room contains uncured resin, washing, or curing. Fans that respond to temperature and humidity can cycle, but a printer running cool and a curing station running warm produce fumes at different times, so a steady setting is easier to reason about. Keep the airflow rate modest enough that the enclosure stays at a stable working temperature.
Where should a resin printer enclosure exhaust?
Outdoors, through a discharge point away from doors, windows, air intakes, and neighboring windows. A high exterior wall or a soffit vent is typical. Never discharge into a garage, attic, crawl space, or occupied room, since that relocates the fumes instead of removing them. If the duct penetrates a wall, use a rated sleeve and check local building and fire code requirements.
Can I use a grow tent for a resin printer?
Yes, and it is a common first build. A tent gives you a frame and fabric skin quickly, and the resin printer vented enclosure setup works as long as you add a duct fan and filtered port for the exhaust plus a low intake. Watch two things: the fabric is not a substitute for sealing the seams well, and tents are combustible, so keep the fan and duct clear of the fabric and the printer’s heated components.
What should I do if I still smell resin after installing ventilation?
Find out where the air is going. Test for negative pressure with a tissue at the door seam, check for a blocked intake, and inspect every duct joint for a gap. Running the fan without resin present can reveal leaks. If the smell persists and the seams hold, check the filter media and confirm the fan is actually drawing through the filter. Still unresolved, stop printing and reassess the design.
Conclusion: Start With the SDS, Then the Enclosure
Start with the safety data sheet for your resin and the manual for your printer. Those two documents set the ventilation approach, the temperature range, and the handling rules that the rest of the build has to respect.
Then build an enclosure that captures fumes at the source and discharges them outdoors, held at slight negative pressure, with a low make-up air intake and no path for liquid resin to reach the fan. The build is straightforward; the parts that people skip are the low intake, the sealed joints, and the spill tray, and those are the ones that decide whether it works.
Give it a week of monitoring before you trust it, and treat persistent odor, leaking fumes, or any symptoms as a reason to stop and fix the design rather than live with it.