To electroplate a 3D printed part, you smooth the print, seal it with a conductive paint or varnish, then hang it in a metal electrolyte bath wired to a low-voltage DC supply so metal ions deposit onto the surface as a thin shell. The whole job is slower than most people expect: printing, prep, painting and a multi-hour plating run add up to five hours or more per part in a small home setup.
That slow pace is also the reason to do it. Copper plating in particular is forgiving, because a bad layer usually peels off and you can clean the part and run it again instead of scrapping the work. This guide walks through the full sequence for how to electroplate 3D printed parts, from material check to final inspection, and is written for makers and small shops rather than industrial finishers.
If you have never plated anything before, print a small test coupon with a flat face and a couple of protrusions. Flat surfaces show coverage problems fast, and you learn the behaviour of your bath before the expensive part is hanging on the wire.
Table of Contents
- What You Need
- Step-by-Step: How to Electroplate 3D Printed Parts
- 1. Check That the Part and Plating Process Are Compatible
- 2. Remove Support Marks and Prepare the Surface
- 3. Apply a Conductive and Adhesive Layer
- 4. Set Up the Plating Bath and Electrical Circuit
- 5. Plate the Part and Control the Deposition
- 6. Rinse, Dry, and Inspect the Finish
- Common Mistakes and How to Fix Them
- Safety, Ventilation, and Waste Disposal
- Frequently Asked Questions
- Can you electroplate a 3D printed plastic part directly?
- What 3D printing material is best for electroplating?
- Do I need copper tape, or does conductive paint work?
- How thick can electroplating get on a 3D printed part?
- Why is electroplating peeling off my 3D print?
- Is electroplating safer than electroless plating for small parts?
- Conclusion
What You Need
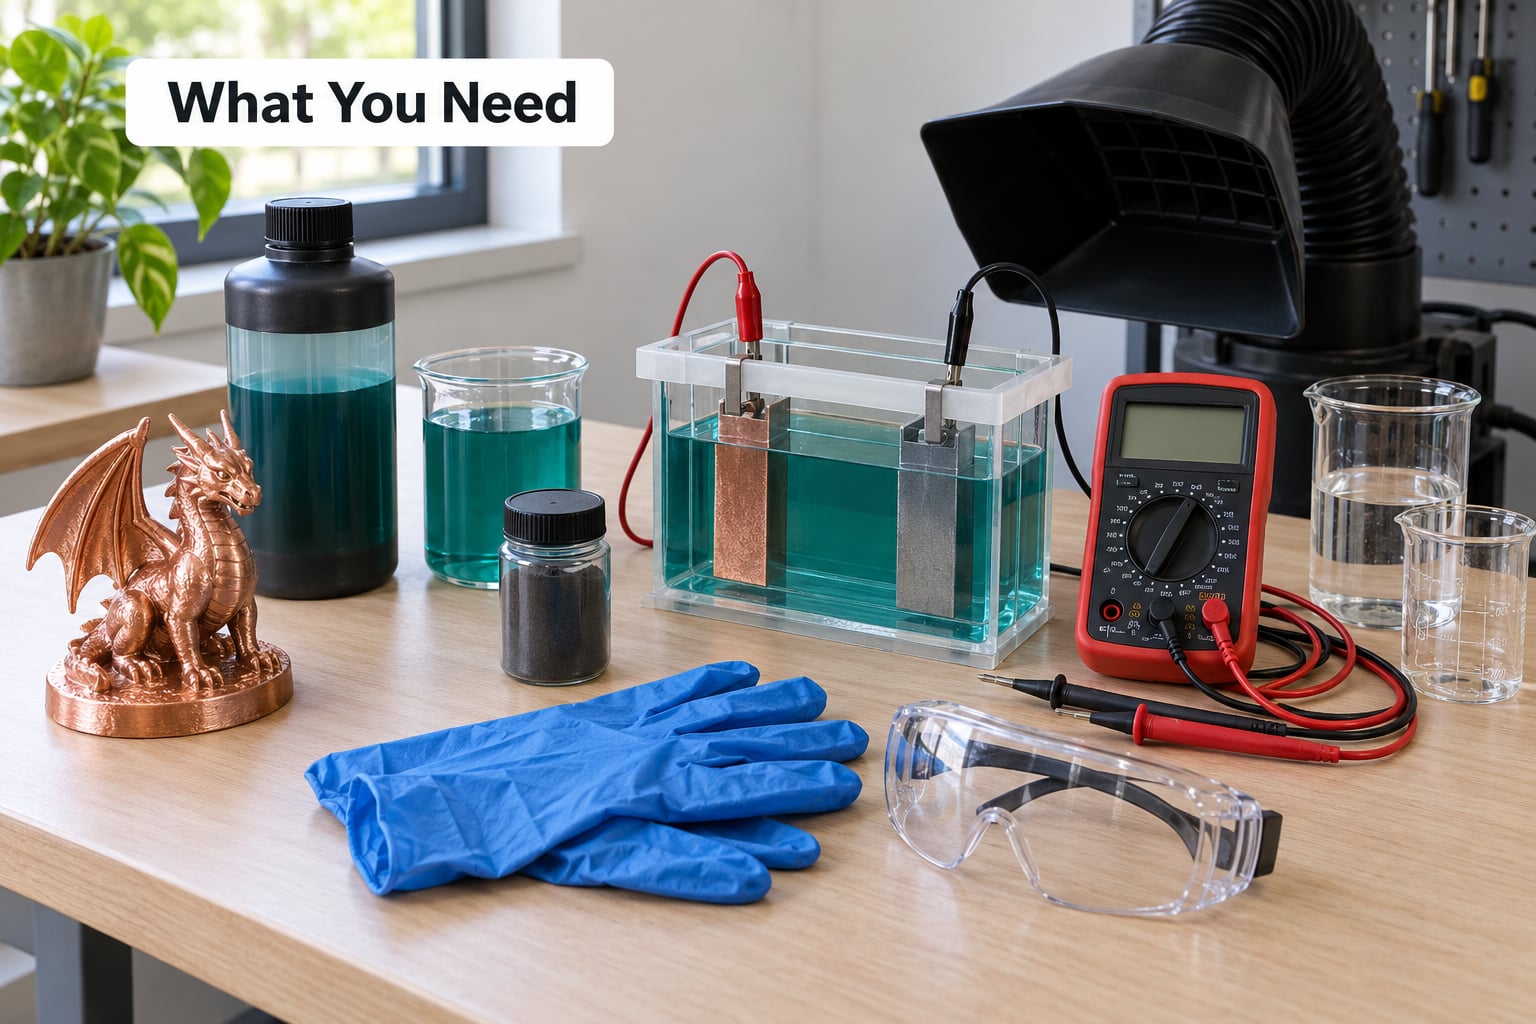
Here is the kit list, gathered in the order you will actually use it:
- The printed part, already cured, cleaned of loose powder or support scars.
- Conductive coating — copper conductive paint or copper conductive varnish are the reliable choices. Graphite paint works but leaves brush texture and occasional unplated patches. Silver paint is the one to skip, because it corrodes the copper layer underneath.
- Plating bath and matching anode — an acidic copper electrolyte sold as a kit with a copper anode bar, or another metal electrolyte with its own anode. The anode has to be the same metal you want to deposit.
- DC power supply — a bench supply with a current limit is easiest. A strong DC supply plus a step-up converter works and costs less, but it is less precise, so you compensate by watching the bath rather than the dial.
- Ventilation and PPE — a fume-extraction fan or a well-ventilated bench, chemical splash goggles, and gloves compatible with the specific chemistry.
- Surface prep supplies — sandpaper from about 120 grit up through 800 to 2000, filler primer or spot putty, a degreaser, isopropyl alcohol, and clean water for rinsing.
- Testing tools — a multimeter for continuity checks, a wire brush, fine files and a soft cloth.
- Rinse and waste containers — separate containers for rinse water and for spent electrolyte, clearly labelled and never poured down a drain.
On materials: resin parts are the friendliest starting point because the surface is already smooth, so plating hides rather than magnifies defects. FDM prints work, but they need far more sanding and filler primer to knock down the layer lines. Glass-fibre-filled and carbon-filled plastics are a poor choice — the exposed fibre ends create sites where coating coverage breaks. Nylon is troublesome to plate because of adhesion, and TPU tends to flex and warp. PLA and PETG are usable with careful prep, and ABS and ASA hold up well on stiffness. Plain metal-filled filament is not a shortcut: the metal particles inside it are not electrically connected to each other, so there is no usable conductive path to plate from.
Step-by-Step: How to Electroplate 3D Printed Parts
Ordinary plastic cannot be plated directly, because current has nowhere to go. Everything below is in service of one goal: a continuous, unbroken conductive path over the entire surface you want coated.
1. Check That the Part and Plating Process Are Compatible
Start by naming the material and the surface you are going to plate. Thermoset-style filled filaments, parts with a glossy anti-adhesive layer on them, and any geometry that traps uncured resin or support material inside a closed volume will fail no matter how well you set the bath up. Heat-sensitive thin-wall parts can bow during drying, so choose a stiffer material or redesign the wall thickness first.
Also decide at this stage whether you want electroplating or electroless plating. Electroplating uses an external current and gives you control of thickness, but it needs a conductive coating and good electrical contact. Electroless plating is a chemical reduction with no external circuit — it coats complex shapes more evenly and needs fewer contacts, at the cost of bath cost, control and waste volume. For one smooth decorative shell, electrolytic copper is the sensible starting point.
2. Remove Support Marks and Prepare the Surface
Take the supports off while the part is still slightly warm and before it fully hardens, then sand the scars down. Work up the grit ladder — 120, then 240, then 400, then 800 — and go finer still if you want a mirror finish. Plating magnifies everything, so a scratch you cannot see in bare plastic becomes a crater in the metal.
Fill low spots with filler primer or spot putty, let it cure, and sand flush before moving up the ladder. Then deburr edges and knock off dust. Rounded edges matter more than they sound: a sharp edge concentrates current and burns first, so break sharp corners and through-holes slightly with sandpaper or a file.
Do not over-smooth. Sanding changes dimensions, and aggressive polishing can burnish the plastic into a surface that rejects adhesion. Stop when the part feels right, not when you have erased all the print texture — some texture gives the coating something to grip.
3. Apply a Conductive and Adhesive Layer
Degrease the part with a plating-grade degreaser, rinse with clean water, dry fully, then wipe with isopropyl alcohol. Any oil, release agent or fingerprint left here will cause the plating to peel later, and you will not see the problem until it is too late to fix cheaply.
Paint the conductive coat on in thin coats. For spraying, thin copper conductive paint or varnish with acetone at roughly one part paint to two parts acetone, spray, and let it flash off between coats. Be aware that copper and silver conductive paints clog airbrush nozzles as they dry, so keep the tip clean and thin the mix further if it spatters.
Cover the whole surface you intend to plate, with no thin spots, pinholes or exposed plastic. Edge coverage is where most failures start, so run a slightly heavier coat around rims, corners and the inside of holes. Let the coat cure fully — usually several hours — then sand very lightly to knock off any high spots that would concentrate current.
Test for a continuous conductive path with a multimeter before you fill a tank. Anywhere the meter beeps continuously from the contact point to the far side of the part is plated. Anywhere it beeps intermittently, or not at all, is a hole in your circuit, and current will find a shortcut and deposit where you do not want it.
Copper tape is the other option, and it works well for small flat parts or for making a contact point. It is fiddly to apply to curved surfaces without wrinkles and air pockets, and every wrinkle is a future bubble, so paint is the better default for anything with compound curves.
4. Set Up the Plating Bath and Electrical Circuit
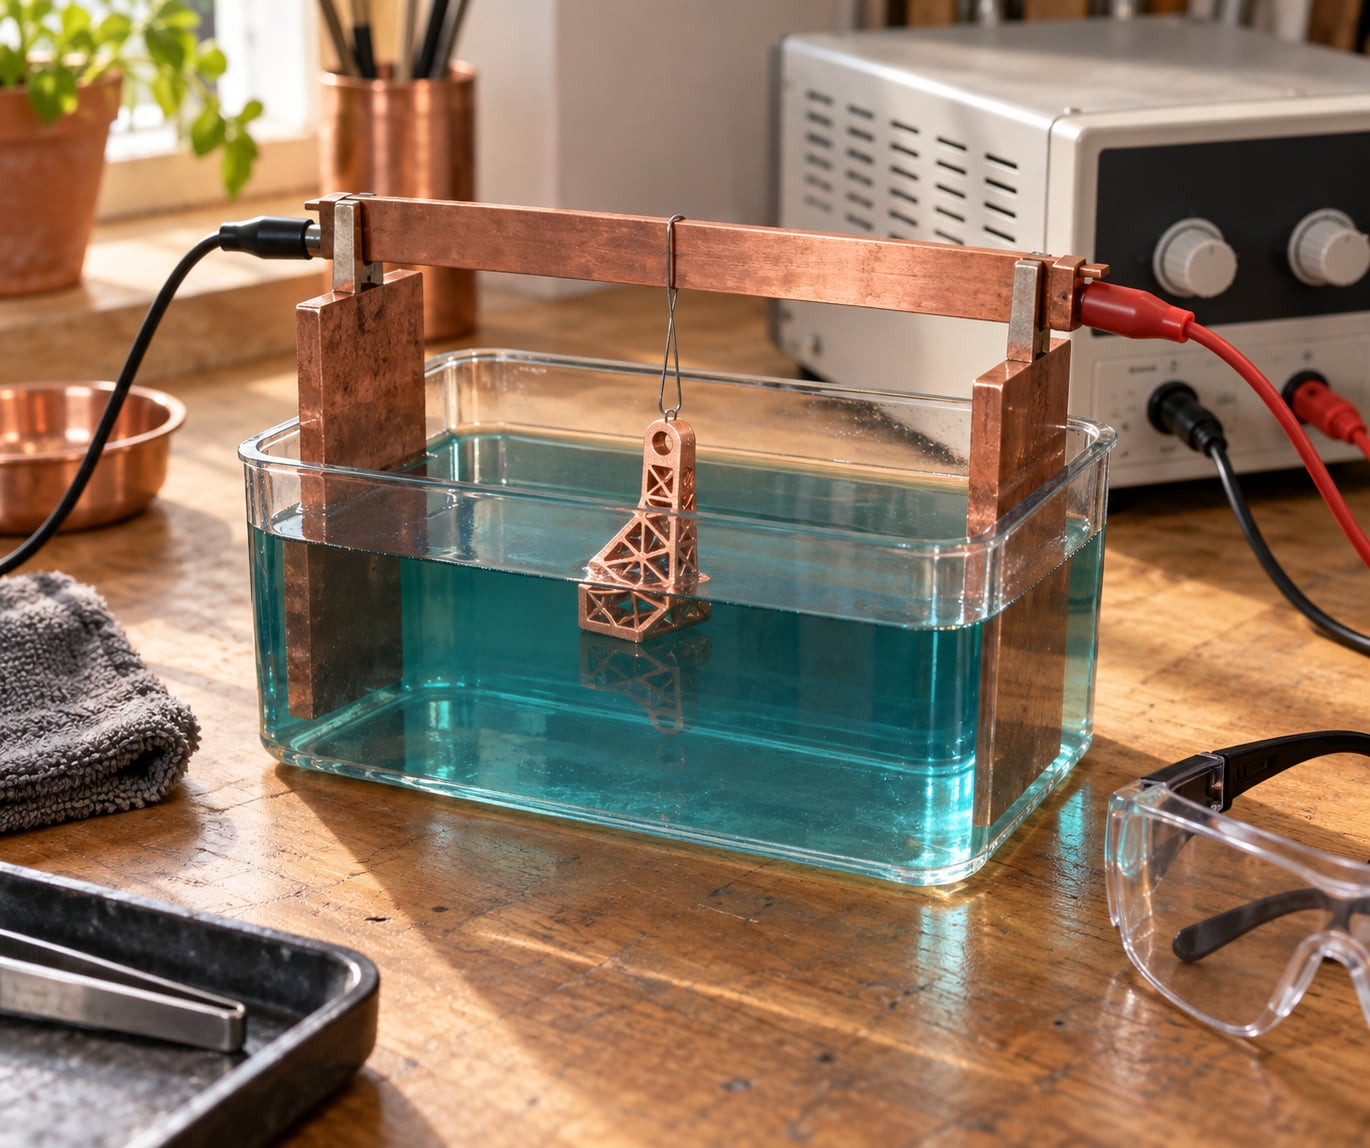
The part becomes the cathode — the negative terminal. The metal bar becomes the anode — the positive terminal, and it slowly dissolves to replace the metal ions plated out of the solution. Both sit in the electrolyte. If you reverse the polarity, metal deposits on the anode and the part gets a thin, patchy, dark film instead.
Fill the tank with the electrolyte, submerge the anode with plenty of surface area — roughly the same or greater area than the part — and hang the part on a wire that sits above the bath and is fully submerged where it clamps on. Keep the anode opposite the part, not underneath it, because the part will shadow that area and grow thin.
Set the current limit before you power up, and follow the current density, temperature and voltage figures in the plating solution’s own documentation. Current density in amps per square decimetre is the number that actually controls deposit quality; raw voltage is a proxy that varies with anode condition, solution age and distance. If your two electrodes sit closer together, the reading changes even though nothing about the part has changed.
Warm the bath if the chemistry calls for it, start gentle air agitation, and pre-wet the part by dipping it before energising. Keep the tank in a ventilated space, away from anything that acid or the salts will attack, and keep connections above the liquid where possible so an energized terminal never sits in solution.
5. Plate the Part and Control the Deposition
Lower the part into the bath, connect both leads, bring the current up gradually, and then leave it alone. Copper is normally plated in stages rather than in one long run: start at a low current to establish a thin, even seed layer, raise the current, and hold it. Exact voltage, current density and duration must come from the instructions for your specific electrolyte, because a bright acid copper bath and a high-efficiency alkaline one behave very differently at the same dial setting.
Agitate the bath, or slowly rotate the part, throughout the run. Without movement you get thin centres and thick edges, and the wire contact welds itself to the plating. Many people hang the part from a wire clip at a high, mostly submerged point so the weld mark sits somewhere you can sand or disguise afterwards.
Watch the part, not just the clock. Bubbling, a shift in bath colour, a steady rise in voltage with the current unchanged, or a smoky smell that is not simply the bath warming up all mean something is off, and the safe move is to cut power, lift the part, rinse it, and look. Short cycles — fifteen or thirty minutes, then a rinse and inspect — recover from small problems far better than a single long unattended run.
6. Rinse, Dry, and Inspect the Finish
Rinse in sequence: the plating solution, then a rinse bath, then clean or distilled water, moving the part gently so the fresh water actually reaches every surface. Skipping the immediate distilled rinse is the usual cause of the dark spots and haze that show up a day later, as residual acid keeps reacting with the fresh metal.
Dry fully, then inspect for coverage, adhesion, thickness, roughness and discoloration. Check continuity over the coated surface to confirm there are no bare plastic patches. For adhesion, flex the part gently away from the coating; a good bond resists and a weak one lifts at a corner, and a light scuff test with a coin edge on a spare area will show you a soft, powdery deposit immediately.
Measure thickness if the thickness matters. A micrometer on a known-flat area, or a magnetic or eddy-current gauge for thicker nickel and steel-type deposits, tells you whether you are at the spec you planned for. Then seal or clear-coat if the part will be handled, and keep in mind that a sealed decorative part will not take a second plating run without stripping back to clean metal.
Common Mistakes and How to Fix Them
Most failures trace back to preparation, contact or current control, and copper plating is forgiving enough that you can usually fix a part and run it again rather than reprinting it.
| Symptom | Likely cause | Fix |
|---|---|---|
| Plating peels off in patches | Conductive coat too thin, contaminated, or not fully cured | Strip back to clean plastic, degrease again, apply two or three thin coats, cure fully, re-test continuity |
| Rough, matte, grey finish | Current too high for the surface area, oversized anode, or poor agitation | Lower the current, match anode area to the part, increase agitation, check the bath temperature |
| Dark spots and staining | Acid or salt left on the part after the bath | Rinse immediately in clean or distilled water, then dry straight away |
| Thin deposit overall | Wire contact area too small, or the part is shadowed by the anode | Increase the submerged contact area, reposition the anode opposite the part, rotate during the run |
| Burn marks on edges | Sharp edges and through-holes concentrating current | Round all edges and holes before coating, and keep the current inside the bath’s stated range |
| Bubbling around the wire | High local current where the wire meets the part | Move the contact up into less exposed electrolyte, spread the contact, lower the current |
| Thick deposit that flakes later | Hydrogen absorbed into a fast, thick deposit | Plate slower in more, shorter cycles, use a brightener, and relieve stress before finishing |
| Exposed plastic in recesses | Coating did not reach the area, or a bubble formed there | Fill the recess during prep, add a light second coat, and use gentle agitation to release bubbles |
The dark spots and the peeling share one mechanism: galvanic corrosion. Two dissimilar metals in electrical contact, one of them electrolyte-wet, corrode at each other, and a thin, uneven deposit over a plastic substrate is exactly the arrangement that makes it happen. A proper, even, well-cured coating plus a clean rinse is what keeps corrosion at bay.
Two more habits save a lot of parts. Rotate the part in the bath, which most people treat as optional and which actually decides whether the deposit is even. And keep a spare wire clip on hand, because a wire that welds to the part cannot be removed without taking the plating with it.
Safety, Ventilation, and Waste Disposal
Can you do electroplating at home? For a hobbyist, yes, with a ventilated work area, the right protective gear, a careful eye on your local rules for waste, and a willingness to treat the electrolyte as a genuine chemical rather than a craft supply. The acids and metal salts involved will burn skin and eyes, and the electrical side carries its own risk around a full bath of liquid metal.
Read the safety data sheet for the exact product you bought, and follow it. The glove material matters: a thin disposable nitrile glove is not adequate for prolonged handling of some plating solutions, and the datasheet will specify what is. Splash goggles, a lab apron or a chemical-resistant apron, and closed shoes are a sensible minimum, and I would add a nitrile glove layer for degreasing and rinsing steps.
Ventilate properly. A fume fan or extraction arm over the tank beats an open window, and I would run the fan whenever the bath is warm, because acidic copper solutions give off fumes that are unpleasant at best. Never mix chemistries — keep a dedicated tank, dedicated leads and dedicated anodes per metal, because cross-contamination ruins a bath and can produce a mess that reacts badly.
Manage the electrical side. Use a supply with a current limit, keep hands and tools out of the bath while it is energized, and keep terminals and connections above the solution line. If the bath is in a plastic tank, keep it on a stable, non-conductive surface away from anything you would mind losing to a spill, and never dip a part into a container that has held an incompatible chemistry.
Waste goes through a hazardous-waste route. Spent acidic copper electrolyte, rinse waters from the plating bath, and used anode bags are chemical waste, not household waste, and pouring them down a drain is both illegal in many places and genuinely harmful to the water system. Most areas have a household hazardous waste facility or a collection day that will take small quantities, and the supplier of your kit can usually tell you what their local arrangement is. Filters, gloves and absorbents soaked with solution go in the same stream.
Legality is simpler than people fear. There is nothing illegal about plating a part you printed yourself, and there is no restriction on the finish or the purpose. The regulatory lines are about chemical waste handling, workplace ventilation standards if you are plating for a business, and disposal — not about the object you end up with.
Frequently Asked Questions
Can you electroplate a 3D printed plastic part directly?
No, not in its raw state. Plastic is an electrical insulator, so current cannot reach the surface and no metal will deposit. You first have to give the whole surface you want coated a continuous conductive path: copper conductive paint, copper conductive varnish, or copper tape. Skip that layer and the part either stays bare or plates in scattered patches where it happens to touch the bath.
What 3D printing material is best for electroplating?
Resin prints are the easiest, because the surface is already smooth and plating hides rather than magnifies defects. ABS and ASA hold up well on stiffness. FDM prints in PLA or PETG work with much more sanding and filler primer. Glass-fibre and carbon-filled plastics, thin-wall TPU and nylon all cause recurring problems, and plain metal-filled filament is not conductive enough to plate from.
Do I need copper tape, or does conductive paint work?
Conductive paint or varnish is the better default, especially on curved parts, because it wraps into every groove without wrinkles. Copper tape suits small flat pieces or a quick contact point, but each wrinkle or air pocket is a place the plating will bubble later. Whichever you use, test the whole surface with a multimeter for a continuous beep before the part goes anywhere near a bath.
How thick can electroplating get on a 3D printed part?
Thickness is set by the electrolyte, current density, temperature, run time and how much surface the current is spread across. Short decorative copper runs build a thin, bright layer quickly, while functional nickel builds in the hundreds of microns over many cycles. Going much thicker in one long run risks a hydrogen-heavy deposit that is brittle and flakes, so add thickness in stages with rinsing in between.
Why is electroplating peeling off my 3D print?
Almost always preparation, the coating, or contamination. Common causes are a thin conductive coat, a coat applied over oils, a part that was not fully dried or fully cured, a rough surface that gave the current nowhere to flow, and a deposit built too thick too fast. Strip back to clean plastic, degrease, apply two or three thin coats, cure properly, and run shorter cycles in stages.
Is electroplating safer than electroless plating for small parts?
Neither is automatically safer; they are risky in different ways. Electroplating adds a low-voltage electrical circuit and a heavy metal salt bath, but you control the current and the thickness. Electroless plating has no circuit to energize, which is a real plus around a plastic part, but it uses a hotter reducing bath that needs careful handling and produces more waste volume. Pick on geometry and control needs, then follow the datasheet for whichever you use.
Conclusion
If you remember four things, make them these: identify the material and the surface you are plating, build a continuous conductive layer and prove it with a meter, prepare the surface carefully and keep it free of oil, and then follow the plating bath manufacturer’s own figures for current, temperature and time rather than any number you find in a forum thread.
Start with a small test coupon rather than the part you actually care about, and expect five hours per part before you get quick. If uniform coverage on a complex shape matters more than precise thickness control, look at electroless plating instead, and give yourself a couple of failed coupons before committing to the piece you care about.