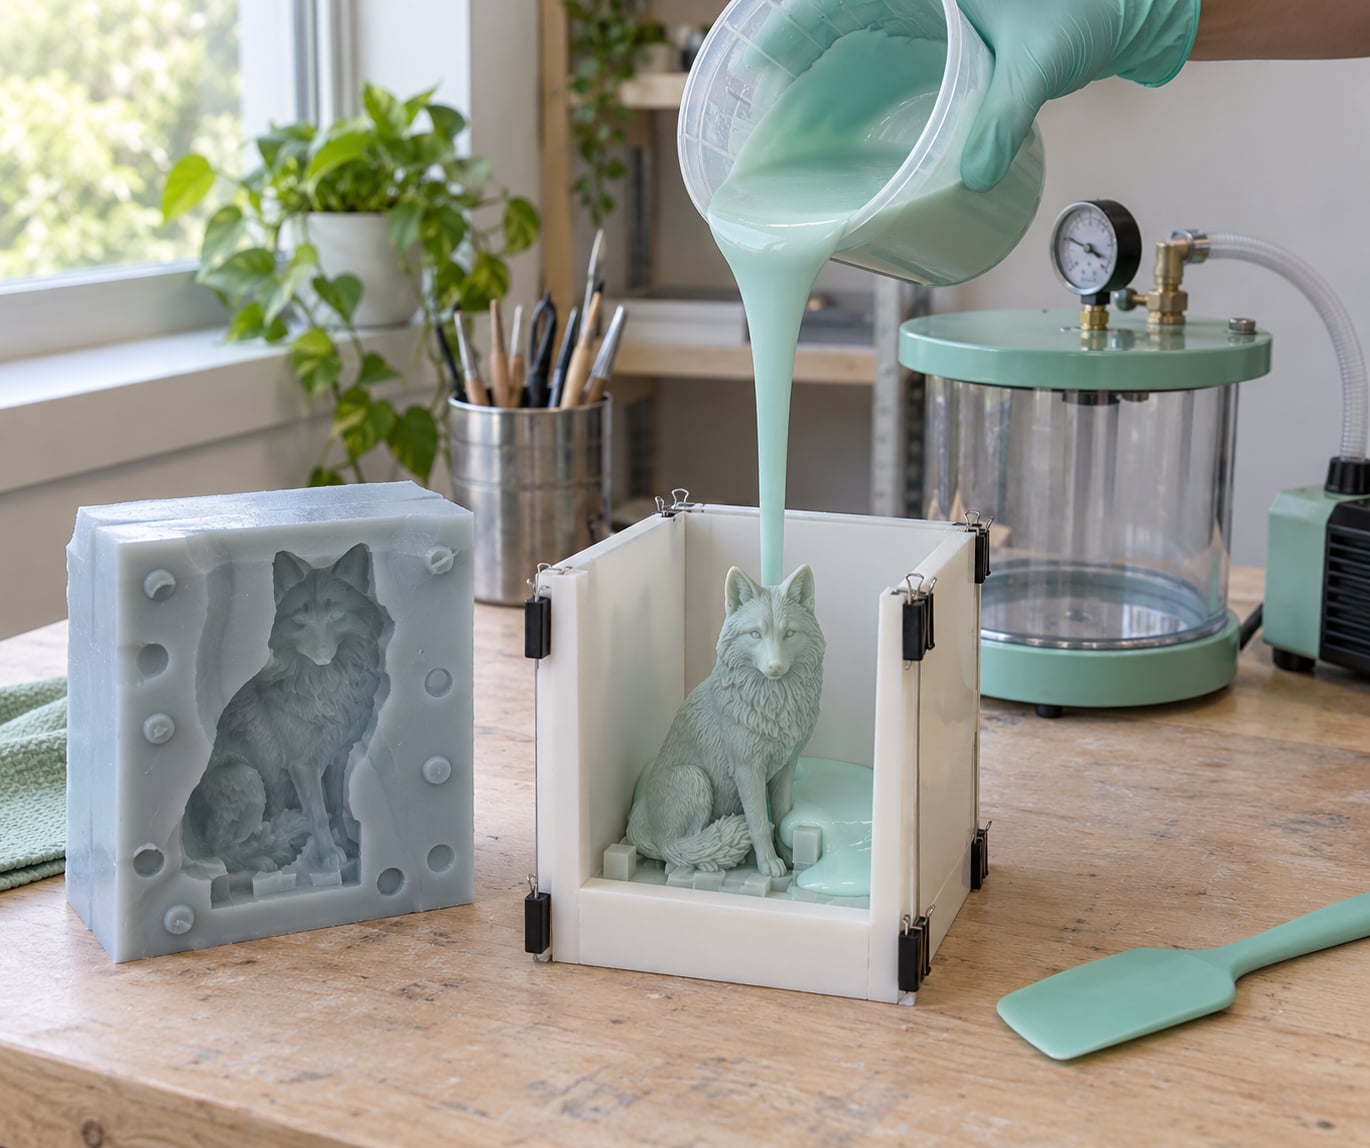
Making silicone molds from 3D prints comes down to four phases: finish and seal the printed master, contain it in a leak-proof box, mix and pour the two-part silicone, then cure and demold. A first mold takes about an hour of active time plus curing, and the skill you need is tolerance control, not expensive gear.
The tricky part is that liquid silicone copies every flaw on the master faithfully, then hardens around it forever. Get the surface right and one cheap pour gives you dozens of clean casts. Rush the sealing stage and you get a mold full of bubbles stuck to a ruined print.
- Prepare and seal the master. Sand through 180, 400 and 800 grit, fill the layer lines, prime and let it dry fully.
- Build the mold box. Leave roughly half an inch of silicone wall around the part and seal every seam.
- Mix and pour. Weigh equal parts by weight, stir 60 to 90 seconds, degas, then pour from 12 to 18 inches up.
- Cure and demold. Wait the full cure window on the product sheet, then peel slowly along the parting line.
Table of Contents
- What You Need
- Design and printing
- Molding equipment
- Safety gear
- Optional but useful
- Step-by-Step: Making Silicone Molds from 3D Prints
- How do you make a 3D-printed master for silicone molding?
- How should you print the master when making silicone molds from 3D prints?
- How do you mix and pour silicone without bubbles?
- How do you cure and remove the silicone mold?
- Common Mistakes
- Frequently Asked Questions
- What is the best filament to use for 3D printing silicone molds?
- What is the best 3D printer for making silicone molds?
- Does WD-40 work as a mold release?
- Why won’t my silicone cure against my 3D print?
- How thick should a silicone mold wall be?
- How many casts can one silicone mold make?
- Conclusion
What You Need
Most of this list you probably already own if you print at all. The two items worth buying before your first pour are a vacuum chamber and a proper mold release, because both are the difference between a clean mold and a ruined one.
Design and printing
- CAD software that can add draft and fillets. Free options like Blender, Meshmixer or an open-source modeler handle a parting line fine, and you export as STL or 3MF.
- An FDM or resin printer. FDM gives you a cheap, fast master; resin gives you a smooth one. Either works if you post-process properly.
- PLA, PETG, ABS or ASA filament for FDM masters, or a standard photopolymer resin for resin masters.
- Abrasives and fillers: 180, 400 and 800 grit sandpaper, spray filler primer, and a clear coat for sealing.
Molding equipment
- Two-part silicone in a pourable grade. Platinum-cure types give better detail and tear strength; tin-cure is cheaper and easier to demold but shrinks slightly more.
- A containment box. Foam board, acrylic sheet, LEGO bricks or a printed shell all work. I prefer a printed shell because the wall gap is already right.
- A mold release formulated for silicone, applied to the master and in some cases to the box walls.
- A digital scale accurate to a gram for mixing by weight, plus mixing sticks, a funnel and a scale for shot cups if you mix by volume.
- A vacuum chamber and vacuum pump for degassing, ideally at least twice the volume of the silicone you are degassing.
Safety gear
Nitrile gloves and a respirator with organic vapor cartridges. Mix in a ventilated space, ideally with a fan pulling air away from your face. Silicone is not acutely dangerous, but uncured fumes irritate and platinum-cure types can exotherm in a large batch, so keep batches modest and pour away from your face.
Optional but useful
A pressure pot for casting resin without bubbles, a hot glue gun for sealing box corners and pinning the master to the floor, and a sharp craft knife for trimming flash after demolding.
Step-by-Step: Making Silicone Molds from 3D Prints
How do you make a 3D-printed master for silicone molding?
Measure the object first, then add the features that decide whether it comes out cleanly. Silicone is elastic, so it releases from shallow undercuts on its own; it does not release from a sharp lip or a zero-diameter hole.
Four numbers matter before you model anything. Wall thickness of the finished silicone should be at least a quarter inch, more like half an inch for anything fragile. Add a draft angle of 1 to 3 degrees to every vertical wall so the mold slides off rather than gripping. Round internal corners with a fillet roughly equal to your wall thickness, because silicone tears at sharp internal corners. And leave clearance of about half an inch around the widest part of the part, all the way to the box wall.
If the part has a through-hole, undercuts deeper than its opening, or an underside you cannot reach, you need two pieces. Set the parting line at the widest cross-section so each half pulls straight off, then add alignment features: a pour spout and a small vent hole on one half, and round dowel or screw registration keys on both so the halves seat in the same spot every time. Model the registration features before you print, not after.
Export a watertight, manifold mesh. Repair any holes in your modeler first, because a mesh that is not solid prints fine and then leaks silicone straight through into your printer bed or onto your bench.
How should you print the master when making silicone molds from 3D prints?
Print it smooth, sealed and rigid. The material matters less than the finish, but resin has one hard limitation you need to know before you start.
For an FDM master, print at a fine layer height with three or more perimeters and around 20 percent infill, orient the part so the surface that matters faces up with the fewest layer changes crossing it, then sand it. Work up through 180 grit to knock down the ridges, 400 grit to level the transitions and 800 grit to take the scratches out. Fill any remaining pits with spray filler primer, sand that back lightly, and finish with a clear coat or epoxy to close the porosity. Give each coat the drying time the can states. Full detail comes from that last hundred microns of surface finish, not from the printer itself.
For a resin master, wash, cure and sand the same way, but start finer since the surface is already flatter. Then watch out: many UV and LED cure resins contain sulfur compounds or residual inhibitor that stop platinum-cure silicone from hardening, even after several coats of primer. The silicone sits tacky at the contact line while the rest of the mold sets normally. If you print in resin, either print the master in a material known to be silicone-compatible, or use a tin-cure silicone, which is far less sensitive to contamination.
Before a full pour, dab a small amount of your silicone onto a scrap area of the master and let it set. If it stays tacky, change something now. That one test has saved more material than any other trick in this process.
How do you mix and pour silicone without bubbles?
Weigh, stir, degas, then pour from a height. Every bubble you see in the finished cavity started as air you failed to remove before the silicone set.
Measure by weight wherever the silicone allows it. Equal parts by weight is the standard for platinum-cure two-part silicones and it removes the guesswork that comes from reading meniscus lines on a cup. Pour both parts into one clean container and stir thoroughly for 60 to 90 seconds, scraping the sides and the bottom, since filler settles there.
Then degas. Put the mixed silicone in a container with at least double the volume of the silicone itself, because it foams up hard as the air comes out. Pull 29 inches of vacuum, hold it until the foam collapses and rises, then release slowly. A cheap chamber made from a plastic tub and a aquarium pump works, and so does a food vacuum sealer if you can get the chamber sealed down. One pull catches most of the air; a second pull a minute later catches what the first stirred up.
Set the master in the box, hot glue it to the floor so it cannot float, and apply a silicone mold release to the master. Give the release time to dry before pouring, commonly around 30 minutes. Pour from 12 to 18 inches up in one thin stream. The fall breaks the surface tension and lets air escape instead of trapping. Keep pouring until the master is submerged by about half an inch, which gives a workable wall without wasting material.
How do you cure and remove the silicone mold?
Give it longer than you think you need, then peel it off slowly. Cure time is measured to full set, and touching it early can mean stretching the cavity surface you worked to make.
Tin-cure silicones often handle in a few hours and fully set overnight. Platinum-cure types commonly take six to eight hours to demold and up to 24 hours for full cure, but the product sheet is the only authority that matters. Follow it, and keep the box somewhere at a stable room temperature rather than somewhere cold or in direct sun.
Before you cut anything away, flex the mold gently to check it feels like solid rubber with no tacky surface. Then peel from the parting line rather than ripping a lobe off, working around the part with fingers behind the pull rather than a knife near the detail. Trim the flash line where silicone squeezed past a box seam with a sharp blade held flat against the mold surface, cutting away from the cavity. If the cavity traps air in blind pockets, drill a small vent at the deepest point with a twist drill held by hand.
Pull a test cast before you commit to a batch. Pour a thin test of resin, plaster or wax into the cavity, let it set, and check whether the detail transferred cleanly. That one test tells you more than any inspection of the empty mold will.
Common Mistakes
Almost every failed mold I have seen comes down to one of the problems below, and each has a straightforward fix once you can name it.
Silicone stays tacky near the master. The usual cause is cure inhibition from an uncured resin print or from contamination on the surface. Test a coupon first, then switch to a tin-cure silicone or a resin rated for silicone contact. Priming alone is not a reliable barrier.
The mold is full of bubbles. You mixed too fast, poured too fast or skipped degassing. Stir slower, scrape the container walls, pull a second vacuum and pour from higher up.
The silicone bonded to the print and ruined it. Release was skipped, applied too thinly or not given its dry time. Apply a silicone-specific release generously and wait the full drying period.
Silicone leaked out of the box. Box seams are open, or the printed shell printed with a gap. Run a bead of hot glue along every interior corner and test the box with water before you mix anything expensive.
Layer lines and pits show up in the castings. The master was not finished. Do the full grit progression, filler primer and clear coat, then run your fingernail over the surface; any catch is a pit you will cast.
The master floated and the cavity is lopsided. Hot glue the master to the box floor and consider a printed plug or a small weight to hold it down during the pour.
The mold tore during demolding. Undercuts were too aggressive or you pulled from the wrong point. Add draft, round the corners, fillet anything sharp and split the mold along a parting line.
A few habits cover most of the rest. Print the box with a wall gap you measured rather than eyeballed, keep the silicone at room temperature before mixing because cold silicone mixes badly and traps air, and run the test coupon before every new combination of master material and silicone.
Frequently Asked Questions
What is the best filament to use for 3D printing silicone molds?
PLA and PETG work well because they print cleanly and sand easily. ABS and ASA hold heat and resist warping during longer prints. The material matters less than the finish: whatever you print, sand through 180, 400 and 800 grit, fill with primer, and seal with a clear coat before pouring silicone. Never pour uncured resin prints into platinum-cure silicone.
What is the best 3D printer for making silicone molds?
An FDM printer is fine for most makers who already own one, especially for larger parts and quick iteration. A resin printer wins on surface finish, which means far less sanding and a cleaner cavity. The resin choice matters more than the printer brand: pick a material known to be compatible with platinum-cure silicone, or plan to use a tin-cure silicone instead.
Does WD-40 work as a mold release?
No. WD-40 is a lubricant and water displacer, not a silicone mold release, and it will contaminate the cavity so the casting sticks to the mold. Use a release formulated for silicone work, apply a thin even coat, and give it a full dry time before pouring. A silicone-specific release costs little and removes the most common cause of a torn master.
Why won’t my silicone cure against my 3D print?
Tacky silicone right at the contact line almost always means cure inhibition, not a mixing mistake. Many UV and LED cure resins contain sulfur compounds that stop platinum-cure silicone from hardening, and they do this even through primer and sanding. Run a test coupon on a scrap area first. If it stays tacky, switch to a silicone-compatible resin or move to tin-cure silicone.
How thick should a silicone mold wall be?
Leave at least a quarter inch of silicone between the master and the box wall, and half an inch if the part is delicate or you plan to pour heavy casting material. That thickness resists tearing during demolding and gives the cast enough wall to survive handling. Too thin and the mold fails during the first pull; too thick and you waste material and risk an undercured core.
How many casts can one silicone mold make?
A well-made mold with a proper wall thickness typically handles tens of casts, and hard-wearing platinum-cure grades with high tear strength can run well past that. Thin walls, deep undercuts and rough casting material shorten the life fast. Clean the cavity and let it fully dry between pulls, and store the mold dusted with release so it does not attract silicone from anything it touches.
Conclusion
Finishing and sealing the master, containing it with real wall thickness, mixing by weight, degassing and pouring from height, then curing the full window and peeling slowly. That is the whole sequence, and each stage is quick on its own.
Start with a simple test shape, check your wall thickness and draft angles before printing anything complicated, and dial in the silicone handling on a small pour. Once the test coupon cures and the first cast comes out clean, scaling up to real production molds is mostly repetition.