The best Cura settings for beginners are simple: 0.2 mm layer height, 200 to 210 °C nozzle for PLA, a 60 °C bed, two wall lines, four top and bottom layers, 20% infill and about 50 mm/s print speed. Start there, print a test cube, then change one setting at a time. Cura has hundreds of options, but only about a dozen matter on day one.
I have spent more hours than I would like to admit inside the Cura preview window, mostly watching my own mistakes show up as red triangles. That is the thing I wish someone had told me first: Cura tells you about most problems before you hit print, as long as you slow down enough to read the preview.
This guide covers Cura 5.x on Windows, macOS and Linux. Menu names shift slightly between versions and some settings sit behind the Expert filter in older builds, but the layout has been stable for several releases. Paths are written out so you can follow along rather than hunting.
Table of Contents
- What Are the Most Important Cura Settings?
- How to Set Up a Basic Cura Profile
- Cura Settings Guide for Beginners: Layer Height, Walls and Top Surfaces
- What Temperature and Speed Should Beginners Use?
- How Do Supports, Brim and Rafts Work?
- How to Avoid Common Cura Print Problems
- How to Save and Reuse Cura Profiles
- Frequently Asked Questions
- What are the best Cura settings for beginners?
- Should beginners use a 0.4 mm or 0.2 mm nozzle in Cura?
- How do I choose the right layer height in Cura?
- What Cura settings help prevent stringing?
- How do I know whether a print problem is caused by temperature or settings?
- Should beginners use supports for every 3D print?
- Conclusion
What Are the Most Important Cura Settings?
Four groups do almost all the work: geometry, temperature, flow and adhesion. Geometry decides what shape the printer is trying to draw. Temperature decides how well the plastic fuses. Flow decides how much plastic comes out. Adhesion decides whether the whole thing stays on the bed.
Quality settings such as layer height, line width and wall count belong to geometry. They change the resolution of the surface and the strength of the shell. Infill is the only quality setting that mostly changes print time and weight, because walls carry almost all the strength in an FDM part.
Material settings cover nozzle and bed temperature, fan behaviour and retraction. These are where most beginner problems live, because they depend on the specific spool of filament rather than on your machine.
Speed settings decide how fast the nozzle moves. Faster is not automatically better: every step up in speed demands more melt throughput, and once you pass what the hotend can melt, you get underextrusion that looks like a slicer mistake but is not.
Here is the order I tune in, and the order I would teach anyone else:
- First layer. Z-offset, bed adhesion, initial layer flow and line width. Nothing above layer one matters if the part peels off at layer 12.
- Temperature. Nozzle temperature for the filament, then bed temperature.
- Flow. Flow rate or extrusion multiplier for the material, not the printer.
- Retraction. Distance and speed, tuned with a retraction tower.
- Speed. Print speed, travel speed and cooling, raised last.
Skipping ahead to speed is the most common beginner mistake I see, and it produces a cube with clean top layers and a shredded middle section.
How to Set Up a Basic Cura Profile
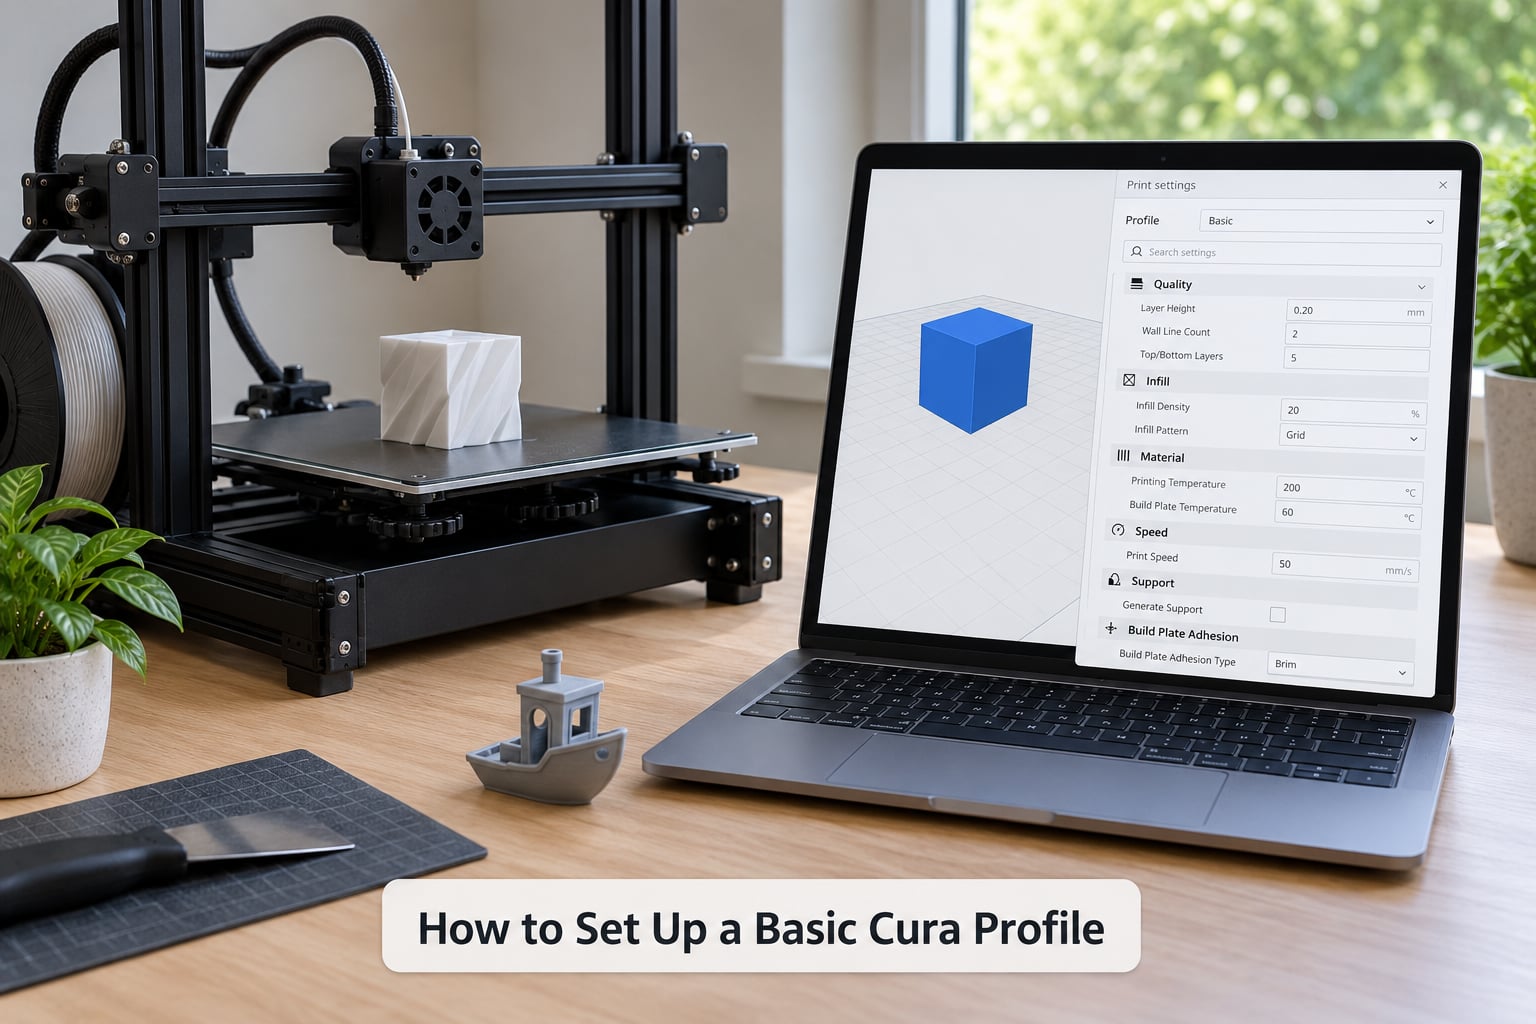
Start with the printer profile, because everything else inherits from it. Go to Settings > Printer > Add printer. Search for your machine by name; if your exact model is missing, choose the manufacturer, then the closest model and the nearest firmware variant. Cura reads start G-code, bed size, origin and axis mapping from that profile, and guessing at those manually is a reliable way to crash a nozzle into a bed.
Two printer choices trip people up. Marlin and RepRap firmware profiles leave bed levelling and Z-offset to you, while profiles with a screen or touch display assume the printer runs its own levelling routine. Pick the one your firmware actually uses, not the one with the nicer name.
Next, open Preferences > Configure Settings. This is the Settings Guide: every panel in Cura carries an icon showing its difficulty, and clicking the filter at the bottom lets you show Recommended, All, or Expert settings. Beginners should read Recommended first and resist switching to All, because All adds roughly 200 settings that are fine on their defaults.
The mode progression is real and worth using. Recommended covers quality, material and speed in plain language. All shows the full General and Extrusion sections. Expert reveals the mesh repair, skirt and brim, availability and dual extrusion options. Move up one level when a specific problem sends you there, then come back down.
Now set the three material numbers for your filament: nozzle temperature, bed temperature and flow rate. Then open Preview and check three things before you slice: the first layer looks like a single connected outline, the toolpaths stay inside the model, and supports sit only where an overhang needs them. All three take ten seconds and catch most first-print disasters.
Cura Settings Guide for Beginners: Layer Height, Walls and Top Surfaces
Layer height is the thickness of each printed slice, and it is the biggest quality dial you have. On a 0.4 mm nozzle, stay between 0.1 mm and 0.3 mm, with 0.2 mm as the sensible middle. A rough rule is that layer height should be 50 to 75 percent of your nozzle diameter; going above that on a standard square nozzle squeezes the bead and the surface suffers.
Halving layer height roughly doubles print time and gives a visible gain in surface detail and Z accuracy. It does not make a part twice as strong, because layer bonding strength does not scale with layer count.
Line width usually stays at its default, which is 0.4 mm for a standard nozzle and 0.6 mm for a larger one. Line width affects how much plastic each line lays down, so widening it on a bowden extruder can push past what the feeder can keep up with.
| Quality setting | Beginner value | What you see when it is wrong |
|---|---|---|
| Layer Height | 0.2 mm | Rough or stair-stepped surfaces, weak Z accuracy |
| Initial Layer Height | 0.3 mm | First lines squashed or splitting apart |
| Wall Line Count | 2 to 3 | Brittle parts, or wasted time and plastic |
| Top Layers | 4 to 6 | Thin, semi-transparent surfaces with gaps below |
| Bottom Layers | 4 to 6 | Warped or weak bases |
| Infill Density | 15% to 20% | Heavy slow prints, or hollow-feeling parts |
| Horizontal Expansion | 0 mm | Holes too tight or too loose |
Walls carry the load. Two perimeters is enough for most decorative and functional parts, three if it takes a beating, and one only when print time matters more than strength. Top and bottom layers must cover the full vertical distance of the model: for a 12 mm tall part at 0.2 mm layers, six bottom layers is the minimum, not a default to trim.
Horizontal expansion is the one quality setting that helps fit problems. A positive value widens the printed path, which tightens holes and slots; a negative value loosens them. Keep it at zero unless you are chasing a specific fit, then move in 0.05 mm steps.
Infill density is the percentage of the interior that gets filled. Keep the pattern and change only the density, because swapping patterns changes how the material behaves. At low density, 15 to 20% does the job for most parts.
| Infill pattern | Strength at low density | Best for |
|---|---|---|
| Gyroid | High for its weight | General parts, models that need strength without mass |
| Cubic | High | Functional parts that get loaded along one axis |
| Grid | Moderate, weak in diagonal directions | Flat parts where surface quality on top matters |
| Lightning | Low | Fast decorative prints, vases, prototypes |
| Concentric | Moderate | Hidden interiors and quick cosmetic parts |
Avoid the patterns designed for resin printers. They fill far more material than an FDM nozzle can lay at speed, and prints will stall or under-extrude.
What Temperature and Speed Should Beginners Use?
Temperature is the setting people guess at most and check least. Manufacturers print a recommended range on the spool, and that range is a good starting point rather than a suggestion to ignore. Print a temperature tower once per new spool and you remove the guesswork permanently.
| Material | Nozzle temperature | Bed temperature | Fan | Print speed | Notes |
|---|---|---|---|---|---|
| PLA | 200 to 210 °C | 55 to 65 °C | 100% after layer 3 | 50 to 60 mm/s | Easiest material to tune; keep the enclosure open |
| PETG | 230 to 250 °C | 70 to 85 °C | 30 to 50% | 40 to 50 mm/s | Slow it down or stringing gets worse |
| ABS or ASA | 240 to 260 °C | 90 to 110 °C | 0 to 20% | 40 to 60 mm/s | Needs an enclosure to limit warping |
| TPU | 220 to 235 °C | 40 to 55 °C | 50 to 80% | 15 to 30 mm/s | Direct drive strongly preferred |
Speed has three separate numbers in Cura, and mixing them up causes confusion. Print speed is how fast the nozzle moves while extruding. Travel speed is how fast it moves while not extruding, usually 120 to 150 mm/s. Initial layer speed is a third value, often 20 to 25 mm/s, used only for layer one so the nozzle has time to settle onto the bed.
Cooling is tied to material, not to preference. PLA wants full fan after the third or fourth layer. PETG wants a partial fan because full cooling makes it brittle. ABS and ASA want almost none, and warping is the usual result of cranking the fan up.
Watch your machine’s maximum volumetric flow, which is the volume of filament a hotend can melt per second. Multiply layer height by line width by print speed and you get the required flow: 0.2 mm by 0.4 mm by 60 mm/s is 4.8 mm³/s, which most 0.4 mm hotends handle comfortably at 0.2 mm layers. The same speed at 0.4 mm layers demands 9.6 mm³/s and many printers cannot deliver it. That is the whole reason a print that works at fine layer height fails at coarse one.
Keep it separate from firmware calibration. E-steps, PID autotune and pressure advance or linear advance live in your printer firmware and change how the machine behaves physically. Flow rate and retraction in Cura are software settings layered on top. If you change one layer without the other, you end up compensating in the wrong place.
How Do Supports, Brim and Rafts Work?
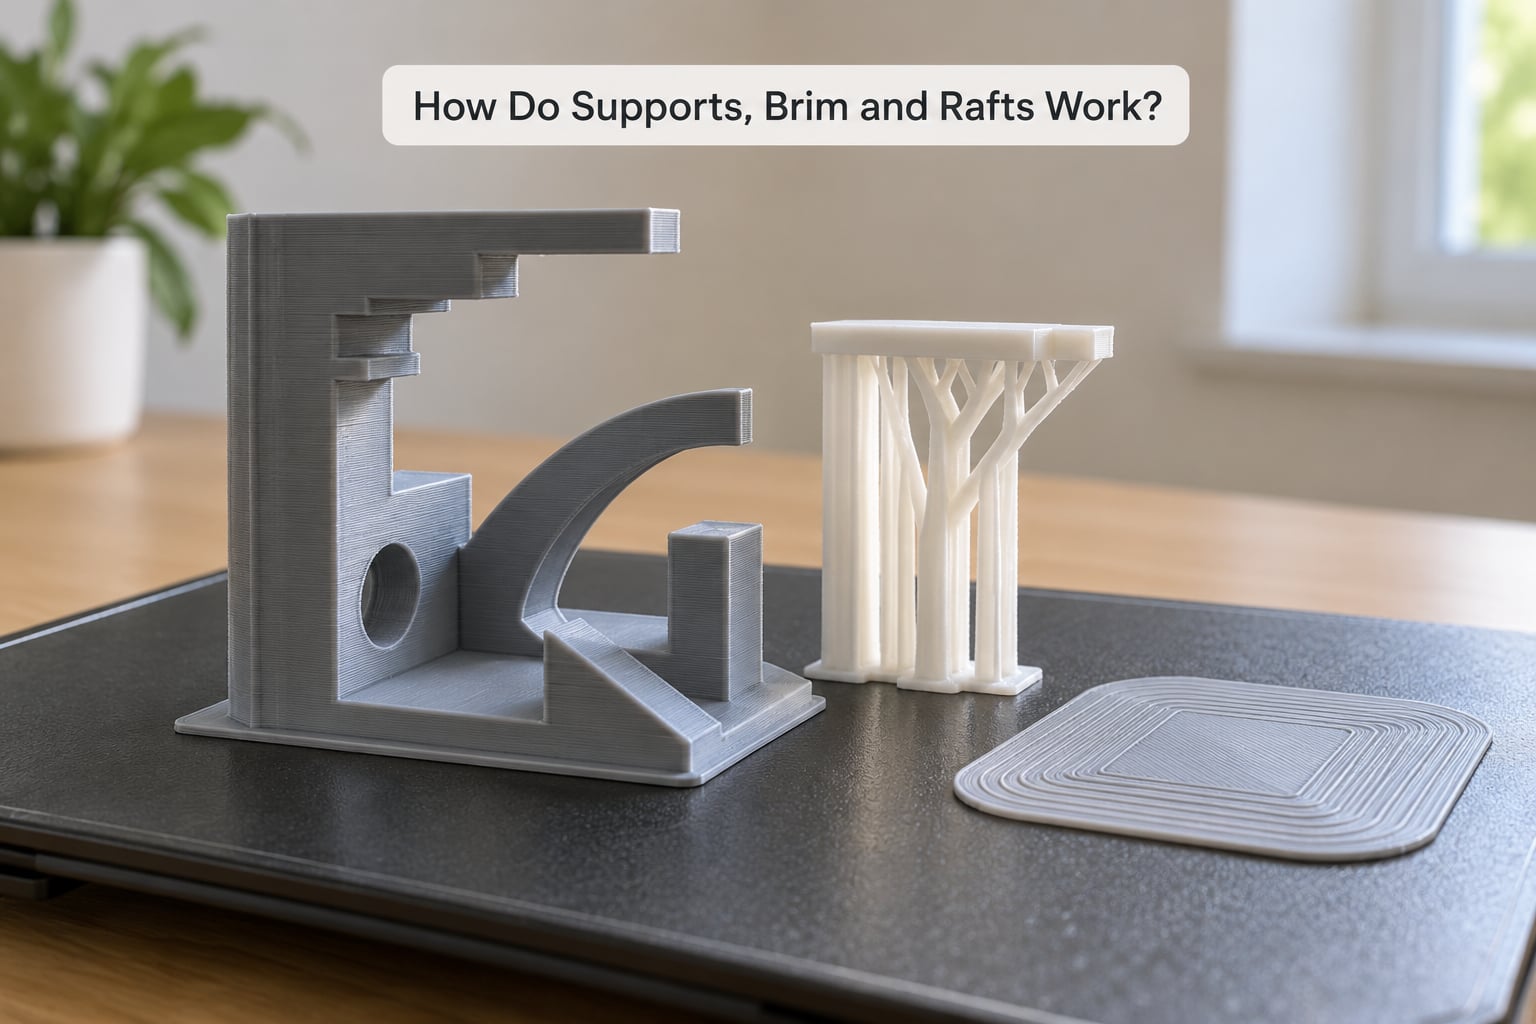
Supports are extra geometry Cura prints under overhangs so the plastic has something to land on. The default enable overhang threshold in Cura is 45 degrees. In practice you want to raise it for smooth, detailed prints, because a low threshold builds support under shapes that could have printed unsupported if the nozzle travelled more slowly.
Three support settings matter most. Support overhang angle decides where support starts, usually 50 to 55 degrees for PLA. Support Z distance keeps the support material a set distance below the overhang, and the right value is about the height of one layer, so 0.2 mm at 0.2 mm layers. Support top distance controls the gap between the model and its support; too small and support removal tears the surface, too large and the overhang droops.
Normal supports print as vertical columns and are easy to understand. Tree supports branch from a single trunk and remove far more cleanly, which makes them the better choice for organic shapes, figurines and anything with a curved underside. In Cura they need the Experimental setting for Tree supports turned on, which hides them behind the Expert filter.
Build plate adhesion is a different job. A skirt is a thin line around the model that primes the nozzle and shows you where the bed starts. A brim is an extra layer of lines around the footprint, and it helps when the first layer has more area than the nozzle can heat quickly enough. A raft is a full slab under the model, useful on a dirty or slightly warped plate or when the print will be removed and machined.
| Option | What it solves | When to use it | Downside |
|---|---|---|---|
| Skirt | Nozzle priming, first layer height check | Almost always | None worth mentioning |
| Brim | Small parts with poor contact, corners lifting | Beds with poor heat spread, small footprints | Removes by hand, uses plastic |
| Raft | Unreliable adhesion on a worn or dirty plate | Failed prints after everything else is right | Longer prints, hard to remove |
| Supports | Overhangs that would droop | Angles steeper than about 50 degrees | Time, material, surface marks |
Work up this list rather than down it. Skirt first, then brim, then raft. Most first layer failures on a clean, level bed are a Z-offset problem, and no amount of brim will rescue a nozzle dragging through the plastic.
How to Avoid Common Cura Print Problems
Match the symptom first, then change one thing. The table below covers the failures that account for most beginner posts on r/Cura and r/3Dprinting, in the order they usually appear.
| Symptom | Most likely cause | First thing to change |
|---|---|---|
| Stringy blobs and hairs between parts | Wet filament, slow travel, too little retraction | Raise nozzle temperature 5 °C, then increase retraction by 0.2 mm |
| First layer lifts or comes loose | Z-offset too low, dirty plate, wrong bed temperature | Set initial layer flow to 105% and re-check Z-offset |
| Corners curl up on large prints | Bed too cold, no enclosure, sudden drafts | Raise bed temperature 5 °C and close doors or add a cover |
| Bottom edge bulges outward | Elephant’s foot from a low Z-offset | Raise Z-offset slightly, lower bed temperature 5 °C |
| Layers separate when pulled apart | Too cold, fan too strong, speed too high | Add 5 °C and cut fan percentage for that material |
| Visible gaps between walls | Over-extrusion, lines too wide for the speed | Lower flow rate by 2 to 3% |
| Weak, thin mid-sections on tall prints | Underextrusion at high speed, heat creep in the cold section | Drop speed, then check the heatsink fan |
| Zits on the surface | Retraction not keeping up on travel moves | Enable combing, add retract speed of 5 mm/s |
| Print shifts mid-layer | Accelerations too aggressive for the frame | Limit print acceleration and jerk in firmware |
| Support marks and torn surfaces | Support Z distance too low | Raise support Z distance to one layer height |
Community experience converges on a few fixes worth trying before anything else. Initial layer flow around 105% with a slightly wider initial layer line reliably improves adhesion on PLA. Gyroid at 15 to 20% is the most commonly recommended starting infill for strength. Reducing bed temperature by 5 to 10 °C is the most reliable elephant’s foot fix there is.
Enabling combing and wiping helps more than most people expect. Combing routes the nozzle through existing infill instead of travelling through open air, and wiping at the end of a retract pulls a string back into the previous line. Together they remove most travel artefacts without touching retraction numbers at all.
If a print is nearly right, save the project file. A .3mf from Cura contains the model and every setting, so you or someone on a forum can open the exact failing configuration instead of guessing from a photo. It is the fastest route to real help, and it is the least used feature in the whole program.
How to Save and Reuse Cura Profiles
The moment a print works well, save the configuration before you change anything. In Cura 5.x, use Profiles > Create Profile to name and store the current settings as a custom profile, and give it a name that tells you the conditions: printer, material and layer height, like Ender3 PLA 0.2mm.
Duplicate rather than overwrite. If a print needs a higher temperature and lower fan for one spool of PETG, create a second profile instead of editing your baseline, so you can always go back to the settings you know work.
A few habits make profiles far more useful over time. Keep one profile per material and per printer rather than one universal profile, because filament and hardware both shift the numbers. Note the spool and the settings you changed in the profile’s description field, since Cura has no comment system of its own. Save a copy of the project file alongside the profile when a print is important, so you can reproduce it exactly even if the profile later changes.
Profiles are not fully portable between Cura versions. Settings occasionally move panels or get renamed between major releases, so keep your custom profiles inside a synced folder and expect to check them after a big upgrade. The stock profiles that ship with your printer are worth preserving too, since they encode the correct start and end G-code for your machine.
Frequently Asked Questions
What are the best Cura settings for beginners?
For PLA on a 0.4 mm nozzle, start at 0.2 mm layer height, 205 °C nozzle, 60 °C bed, two wall lines, four top and bottom layers, 20% gyroid infill, 50 mm/s print speed and 25 mm/s initial layer speed. Keep combing and wiping enabled and leave support disabled until a model needs it. Change one setting at a time and print a small test after each change.
Should beginners use a 0.4 mm or 0.2 mm nozzle in Cura?
Start with the 0.4 mm nozzle that came with the printer. It is faster, stronger and far more forgiving, and it works with every filament type. Move to 0.2 mm later for fine detail such as miniatures or thin walls. If you already have a 0.2 mm nozzle, lower layer height to 0.1 mm and print speed to about 30 mm/s, because small nozzles cannot push much plastic.
How do I choose the right layer height in Cura?
Keep layer height between 50 and 75 percent of your nozzle diameter, so 0.1 to 0.3 mm on a 0.4 mm nozzle. Set the initial layer height slightly higher, around 0.3 mm, so the first lines bond together. Stay at or below 0.25 mm for visible surface detail, and remember that layer height drives print time more than any other quality setting.
What Cura settings help prevent stringing?
Raise nozzle temperature by about 5 °C within your material’s range, which burns off the ooze that becomes string. Then enable combing so the nozzle travels through infill instead of open air, and turn on wiping at the end of each retract. If stringing persists, run a retraction tower and add 0.2 mm at a time. Dry filament fixes more cases than any setting.
How do I know whether a print problem is caused by temperature or settings?
Print a temperature tower with the same model at several temperatures. If each section changes character between bands, temperature is your variable and pick the cleanest section. If every band looks identical and wrong, the problem is geometric, a bad Z-offset, wrong wall count or incorrect flow. Print a second tower in the opposite direction of the temperature range to confirm.
Should beginners use supports for every 3D print?
No. Most models print fine unsupported, and unnecessary supports add time, plastic and surface marks. Raise the enable overhang threshold to about 50 to 55 degrees for PLA so only genuinely steep angles get support. Turn supports on for anything with a flat roof facing downward, a bridge, or an overhang past roughly 45 degrees, and check the preview to see exactly where they land.
Conclusion
Set up your printer profile properly, then establish four numbers and leave everything else alone: layer height, nozzle temperature, bed temperature and print speed. Confirm the first layer sticks before printing anything long, because that one check explains more failed prints than every advanced setting in the program combined.
Save that working configuration as a named profile straight away, so you always have a baseline to fall back to. After that, change one setting at a time, print a small test, and keep notes on what moved. In this cura settings guide for beginners, the goal is not to master Cura; it is to reach a point where prints stop failing and start telling you what they need.